
To create or edit an Inbound Voice Queue, follow these steps:
-
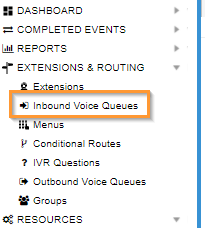
From the left-hand menu, click to expand the EXTENSIONS & ROUTING menu.
-
Click Inbound Voice Queues. The Inbound Voice Queues list appears.
3. Click Add or click Edit for an existing Inbound Voice Queue.

4. Complete the Add Queue panel as described below.
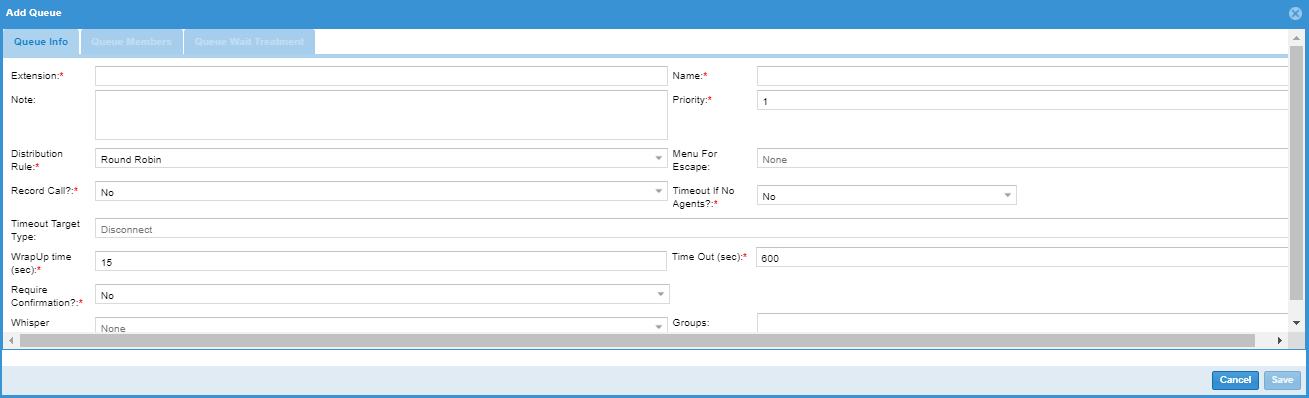
Field Definitions:
-
Extension: Enter a valid ACD extension (as configured on the silhouette system)
-
Name: Enter a meaningful name for the queue (if possible, helping to make the cognitive connection between the CCS system and the resources on the silhouette system)
-
Note: Enter a meaningful description for the queue (try to make the cognitive connection between the CCS system and the resources on the silhouette system)
-
Priority: Queue priority - agents serving multiple queues - calls from the highest priority queue will be offered in preference to calls from lower priority queues
-
Distribution Rule: Select one of Round Robin (calls routed based on a circular sequence), Longest Idle (calls routed based on the longest idle agent) or Fewer Calls (calls routed based on the agent with the fewest calls since midnight)
-
Menu For Escape: A configured menu – see Manage Menus
-
Record Call?: Select either Yes or No
-
Timeout If No Agents?: Select either Yes (Timeout is handled by a Timeout Target Type) or No (there is no timeout – incoming calls stay in the queue until answered)
-
Timeout Target Type: Select one of: Disconnect (call is dropped), Dial (call sent to a non-ACD extension) or Another ACD (call sent to another ACD extension)
-
Timeout Target: The extension number of the timeout target
-
WrapUp time: Wrap-up time allocated to agents before they are placed back in the queue to take calls
-
Time Out: Set a time, in seconds, to denote a call timeout
-
Require Confirmation?: Select either Yes (requires the Agent after answering the call from this Queue to hit a (any) DTMF to confirm their acceptance of the call) or No (no confirmation required)
-
Whisper Announcement: Select a recording from the list
5. Click Save. The Queue Members tab opens.
6. In the Queue Members tab, select agents for the new queue by dragging and dropping agents from the Available Agents area into the Selected Agents area.
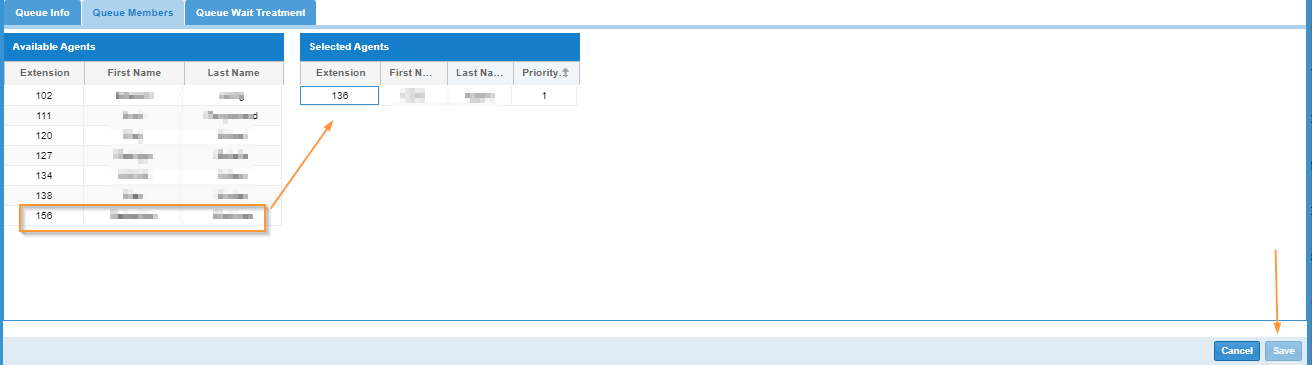
7. Click Save. The new queue is created.