
NOTE: During the nightly maintenance routine, the entire day's raw data is re-summarized from the local hard drive into the SQL database. In the event the SQL database is stopped and restarted during the day, re-summarizing the data ensures the SQL database has the entire set of raw data files. Reports are based on the data in the SQL database. We recommend you schedule your reports to run after the nightly maintenance routine runs, that is, after 2:00 A.M., to ensure the reports are based on the entire day's raw data.
To generate a scheduled report
-
Create a report schedule.
-
Add reports to the schedule.
You can create three types of report schedules: Report schedules, User report schedules, and Employee schedule mailer schedules.
Using Report schedules, you can
-
Run reports on all contact center devices
-
Distribute reports to yourself and to a contact, a contact group, or a specific email address
Using User reports schedules, you can
-
Run reports on agents and employees
-
Distribute reports to yourself and to individuals within the agent groups, employee groups, and teams you select
Using Employee schedule mailer, you can
-
Run reports on employee schedules.
-
Distribute agent/employee report schedules to yourself and to individual employees associated with the schedules you select.
Creating report schedules
NOTE:
-
You must create a schedule and save that schedule before you can add reports to that schedule.
-
You add contacts and contact groups to the Mail Reports from This Schedule To list under the My options menu.
-
If you select printing and mailing options, the Reporter service prints and emails all of the reports included in the schedule on the date the system runs the reports.
You can create report schedules for MiContact Center reports, User reports, and Workforce Scheduling Employee schedules. Using User report schedules and Employee schedule mailer, you can distribute agent/employee reports and work schedules using an automatic email system. The auto-mailer emails the reports and schedules to the individual agents/employees who are members of the agent groups, employee groups, and teams you select for distribution.
Creating MiContact Center Report schedules
To create a schedule for MiContact Center reports
-
Hover over Reporter and select Scheduled Reports.
-
In the Report Schedules tab, click Next>>.
The Properties tab opens. See Figure 4.
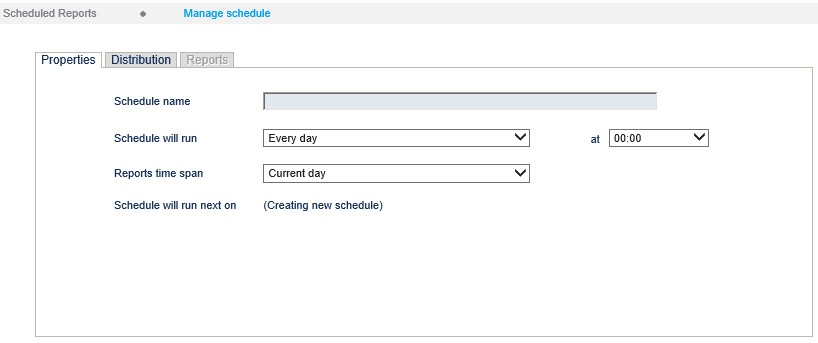
Figure 4: Scheduled Reports: Properties tab
3. After Schedule name, type a schedule name
4. After Schedule will run, select the schedule frequency, for example, every day, every Wednesday, or the start of month.
When you select the day, all of the reports associated with the schedule will be generated that day, every week.
5. After at, click the time of day the schedule will be activated.
For example, if you select Wednesday at 14:30, all of the reports associated with the schedule will be generated every Wednesday at 2:30 P.M.
NOTE: We recommend you schedule your reports for after 2:00 A.M., to ensure the reports are based on the entire day's raw data.
6. After Reports time span, select a time span.
If you select Year to date, the report output includes all of the days from January 1 to the present date. If you select From given start date to current date you will produce reports for your fiscal year.
7. Click the Distribution tab. See Figure 5.
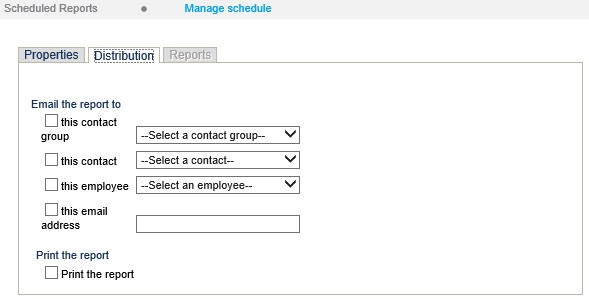
Figure 5: Scheduled Reports: Distribution tab
8. To email the report, select the corresponding Email the report to check box, and select the email recipients.
NOTE: You add contacts and contact groups to the email to list under My options=>Contacts.
9. Click Save.
The date of when the schedule will next run will appear after Schedule will run next on.
10. To print the report, select the Print the report check box.
11. Add reports you want to automatically distribute.
Creating User report schedules and Employee schedule mailer schedules
Creating User report schedules and Employee schedule mailer schedules enables you to automatically email agents/employees/teams their reports.
To create a User report schedule or an Employee schedule mailer schedule
-
Hover over Reporter and select Scheduled Reports.
-
Click either the User report schedule tab or the Employee schedule mailer tab.
-
Click Next>>. The Properties tab opens.
-
After Schedule name, type a schedule name.
-
After Schedule will run, select the schedule frequency, for example, every day, every Wednesday, or the start of month. When you select the day, all the reports associated with this schedule will be generated that day, every week.
-
After at, click the time of day the schedule will be activated. For example, if you select Wednesday at 7:00 A.M., all the reports associated with this schedule will be printed every Wednesday at 7:00
-
A.M.
-
After Reports time span, select a time span. If you select Year to date, the report output includes all days from 1 January to the present date. If you select From given start date to current date, you will produce reports for your fiscal year.
-
Click the Distribution tab. See Figure 6.
-
Select the groups to which you want to email the reports.
-
Click Save.
Add reports. (next section)
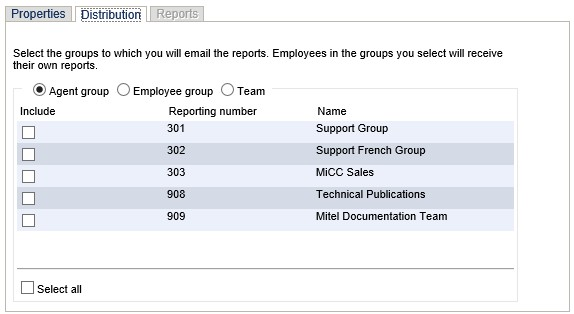
Figure 6: User report schedules: Distribution tab