SUPERVISORS AND INTERACTIVE CONTACT CENTER
Using Interactive Contact Center, supervisors can
- Control the availability of agents and ACD queues
- Log agents on and off of the system
- Have agents leave their agent groups and join other agent groups. Agent groups are assigned to queues so, in this way, agents can be moved from one queue to another as needed
- Have extensions leave their Ring Groups and join other Ring Groups
- Place agents in Make Busy
- Place agents in Do Not Disturb
- Place extensions into Do Not Disturb
- Place queues in Do Not Disturb
- Cancel Work Timer
- Cancel Reseize Timer
An employee's agent can be assigned to multiple agent groups, which can be associated to multiple queues. In order to move the agent from one queue to another queue, the supervisor has the agent leave one agent group and join another agent group.
AGENTS AND INTERACTIVE CONTACT CENTER
Using Interactive Contact Center, agents can
- Log themselves on and off of the system
- Remove themselves from agent groups and place themselves into other agent groups. Agent groups are assigned to queues so, in this way, agents can move themselves from one queue to another as needed
- Place themselves in Make Busy
- Place themselves in Do Not Disturb
Every time agents leave their desks they must set themselves into either Make Busy or Do Not Disturb and apply the applicable reason code. This enables supervisors to track agents' Do Not Disturb and Make Busy activity in reports.
EMPLOYEE AND AGENT CONTROL
Using Interactive Contact Center and Contact Center Client, you can control agents on the following monitors:
- Agent State by Position and Employee State by Position
- Agent State by Time and Employee State by Time
- Agent Shift
Agent control gives you control over individual agents. Monitor control gives you control over all of the agents on a monitor. All of the agents on the monitor are affected simultaneously by the action you take.
If you have Context Sensitivity enabled for monitors, the Agent Control and Monitor Control tabs display in the Contact Center Client ribbon when you have any of the above monitors open. You can perform actions using either a right-click and select method within the monitor or by selecting an agent or an empty cell (monitor control) and accessing the action menu in the Agent or Monitor Control tab views. (See Figure 48.)
Using Interactive Contact Center and Ignite (WEB), you can control agents and employees in the following monitors:
- Employee State
- Agent State
NOTE: Context sensitivity and monitor control are not supported with Ignite (WEB). You can only alter the state for one employee or agent at a time.
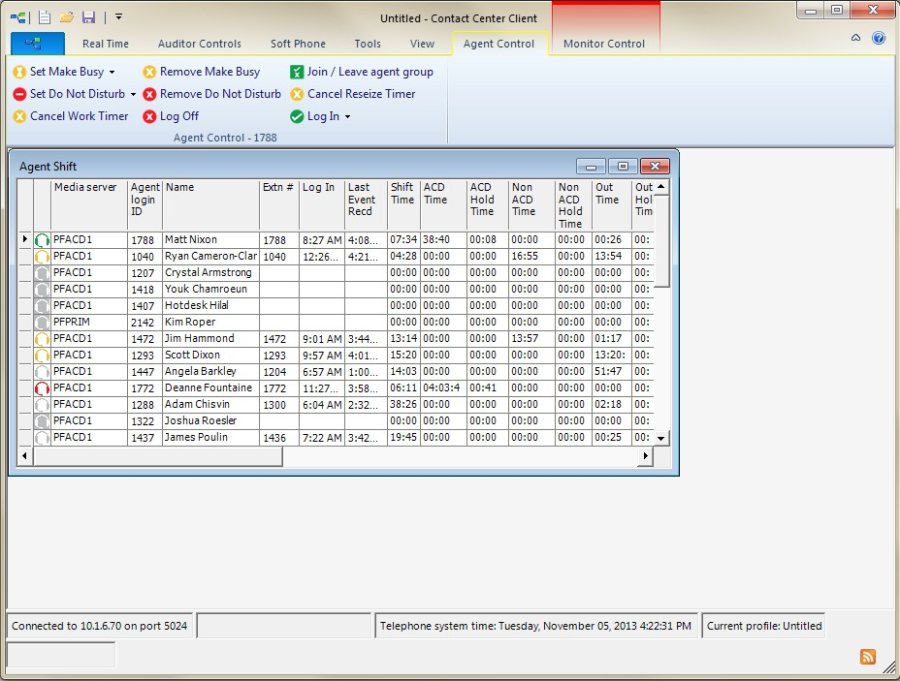
Figure 48: Agent Shift • Agent Control tab options
AGENTS AND AGENT GROUP PRESENCE
Agents can be assigned to multiple agent groups, which are associated with different queues. When agent groups are created, an employee's agents are assigned a default group presence, either Present or Absent. To handle contacts the employee can make themselves present to their agent groups using either Contact Center Client or Ignite.
It is important to note that agents may join or leave agent groups but not queues. Agents become absent from a queue indirectly if they leave all agent groups associated with that queue. An agent who is present in an agent group which is associated to all queues would be disassociated from all queues simultaneously if they became absent in their agent group.
HIDING THE MONITOR CONTROL OPTION
Interactive Contact Center enables you to manage the presence of all devices in a monitor using Monitor Device Control. If you do not want to use monitor control, you can hide this option so it is not accessible.
To hide the Monitor control option
- In Contact Center Client, click File=>Options.
- Under Device control, clear the Display monitor device control option check box.
- Click OK.
LOGGING ON AN AGENT - CONTACT CENTER CLIENT
NOTE:
- An ACD hot desking agent must enter an extension number each time the agents logs on to the ACD routing system using Interactive Contact Center. The agent cannot rely on the extension number last used when logging on. This is because the ACD data stream unifies the agent ID and the extension. After a hot desking agent logs on or off of the ACD routing system using Interactive Contact Center, sometimes the Interactive Contact Center agent controls are not available to the agent for two to five minutes.
- You will be unable to log on an agent to the system if there are no available user licenses.
- If your contact center participates in the use of PINs, supervisors with the correct Class of Service do not require an agent's PIN to interactively log in a hot desking agent.
- Depending on security roles and telephone switch settings, employees who are licensed as Advanced Supervisor or System Administrator may not be prompted to enter a PIN when logging into Interactive Contact Center, Softphone, or PhoneSet Manager.
- If a hot desking agent logs into an extension that serves as the overflow point for a Ring Group, calls to that Ring Group will not be offered to the extension and will remain queued or ringing until abandoned or answered.
- Hot desking users logging into a Ring Group extension must also be a member of the Ring Group to ensure accurate reporting.
You log employee voice agents in and out in either an open Employee or Agent Monitor in Contact Center Client. Multimedia agents are not logged in with voice agents.
To log in an agent in an open Employee monitor
- Right-click the cell of an employee and click Employee control=>Log in=>voice agent. Alternatively, select the employee cell in an open monitor, click Log in from the Employee Control tab on the Contact Center Client ribbon, and select the voice agent. NOTE: When you log in an employee's voice agent, you must enter the extension for the agent. See the procedure below.
To log in an agent by extension in an open Employee monitor
- Right-click the cell of an employee and click Employee control=>Log in=>By extension.
- If the employee has multiple voice agents, select the agent to log in from the drop-down list.
- Type the Agent's extension.
- Click OK.
To log in an agent in an open Agent monitor
- Right-click the cell of a voice agent who is not logged into and click Agent Control=>Log in=>voice agent. Alternatively, select the agent cell in an open monitor and click Log in from the Contact Center Client ribbon. NOTE: When you log in a voice agent, you must enter the extension for the agent. See the procedure below.
To log in an agent by extension in an open Agent monitor
- Right-click the cell of a voice agent and click Agent control=>Log in=>By extension.
- If the employee has multiple voice agents, select the agent to log in from the drop-down list.
- Type the Agent's extension.
- Click OK.
LOGGING OFF AN AGENT - CONTACT CENTER CLIENT
You can log off an employee from all media in an Employee monitor or Agent monitor. Logging off an agent logs off all of the employee's voice agents and sets the employee's multimedia agents to Absent in all their agent groups. If the employee is logged into their soft phone in Contact Center Client, they will also be logged out of the soft phone.
The following procedures take place in either an open Employee monitor or an open Agent monitor in Contact Center Client.
To log off all of an employee's agents in an open Employee monitor
- Right-click the cell of an employee and click Employee control=>Log off. Alternatively, select the employee cell in an open monitor and click Log Off from the Employee Control tab on the Contact Center Client ribbon.
To log off an agent in an open Agent monitor
NOTE: Logging off an employee's agent logs off all of the employee's agents simultaneously.
- Right-click the cell of an agent and click Agent control=>Log off. Alternatively, select the agent cell in an open monitor and click Log Off from the Agent Control tab on the Contact Center Client ribbon.
To log off all employees' agents in an open Employee monitor
- Right-click the monitor and click Monitor control=>Log off. Alternatively, click the Monitor Control tab in the Contact Center Client ribbon and select Log Off.
- Click Yes.
To log off all agents in an open Agent monitor
- Right-click the monitor and click Monitor control=>Log off. Alternatively, click the Monitor Control tab in the Contact Center Client ribbon and select Log Off.
- Click Yes
LOGGING ON AN AGENT - IGNITE (WEB)
When you log on an agent in Ignite (WEB), you make them available to receive voice contacts.
The following procedure takes place in either an Agent State or Employee State monitor in Ignite (WEB).
To log on a voice agent
- In the monitor, select the agent you want to log on.
- Click State=>Available.
- Enter the agent's extension and PIN (if enabled) and click Login. NOTE: This step is not required if the agent is set to automatically log in when the 'Available' state is selected.
LOGGING OFF AN AGENT - IGNITE (WEB)
When you log off an agent in Ignite (WEB), you make them unavailable to receive all media contacts, including voice, email, chat, and SMS.
The following procedure takes place in either an Agent State or Employee State monitor in Ignite
(WEB).
To log off an agent
1. In the monitor, select the agent you want to log off.
2. Click State=>Offline.
JOINING AND LEAVING AGENT GROUPS - CONTACT CENTER CLIENT
After logging into Contact Center Client, agents can use Interactive Contact Center to control their presence status in agent groups. Optionally, supervisors can use Interactive Contact Center to control the presence status of agents in specific agent groups.
NOTE:An agent's ACD hot desk line remains in service while they are logged in as an ACD hot desk user even if they are not present in any ACD groups and not receiving ACD calls.
To join an agent to or have an agent leave an agent group in an open Employee monitor
- Right-click the cell of an employee and click Employee control=>Join/Leave Agent Group=>[Agent]. Alternatively, select the cell of an employee and in the Employee Control tab of the Contact Center Client ribbon, click Join/Leave agent group=>[Agent].
- Select the agent group(s) to which you want the employee's agent(s) to join or deselect the agent group(s) to have the employee's agent(s) leave the agent groups.
- Click OK.
To join an agent to or have an agent leave an agent group in an open Agent monitor
- Right-click the cell of an agent who is logged on and click Agent control=>Join/Leave Agent Group. Alternatively, select the cell of an agent and click Join/Leave Agent Group from the Agent Control tab in the Contact Center Client ribbon.
- Select the agent group(s) to which you want the agent(s) to join or deselect the agent group(s) to which you want the agent(s) to leave.
- Click OK.
JOINING AND LEAVING AGENT GROUPS - IGNITE (WEB)
After signing into Ignite (WEB) and logging into their phone, agents can use interactive Contact Center to control their presence in agent groups. Optionally, supervisors can use Interactive Contact Center to control the presence status of agents in specific agent groups from within the Agent and Employee State monitors in Ignite (WEB).
The following procedures take place in either an Agent State or Employee State monitor in Ignite (WEB).
To join an agent to an agent group
- In the monitor, select the agent for which you want to modify agent group presence.
- Click Agent Groups.
- Hover over the agent group's avatar and select Join All.
- Click Update.
To remove an agent from an agent group
- In the monitor, select the agent for which you want to modify agent group presence.
- Click Agent Groups.
- Hover over the agent group's avatar and select Leave All.
- Click Update.
To join an agent to or remove an agent from all agent groups
- In the monitor, select the agent for which you want to modify agent group presence.
- Click Agent Groups.
- To join an agent to all agent groups, click Join All=>Update.
- To remove an agent from all agent groups, click Leave All=>Update.
To make an agent available or unavailable to answer contacts of a specific media type
- In the monitor, select the agent for which you want to modify agent group presence.
- Click Agent Groups.
- To become available to answer contacts of a specific media type, click the media icon in the agent group so the icon displays in blue.
- To become unavailable to answer contacts of a specific media type, click the media icon in the agent group so the icon displays in grey.
- Click Update.
PLACING EMPLOYEES IN MAKE BUSY - CONTACT CENTER CLIENT
NOTE: Agents in Work Timer can directly enter Busy/MKB or DND if the state is applied manually. Changing states from Work Timer to Busy/MKB or DND without first entering a Classification Code could register a 'Non-Compliant' against voice agents, if Classification Codes are required for the queue.
Placing employees into Make Busy places both employees and all of their agents into Make Busy.
The following procedures take place in either an open Employee monitor or an open Agent monitor in Contact Center Client.
To place an employee in an open Employee monitor in Make Busy
- Right-click the cell of an employee and click Employee control=>Set Make Busy=>reason code. Alternatively, select an empty cell in an open monitor and click Set Employee Make Busy=>reason code from the Employee Control tab in the Contact Center Client ribbon.
To place all employees in an open Employee monitor in Make Busy
- Right-click the monitor and click Monitor control=>Set Make Busy=>reason code. Alternatively, select an empty cell in an open monitor and click Set Make Busy=>reason code from the Monitor Control tab in the Contact Center Client ribbon.
- Click Yes.
To place an employee in an open Agent monitor in Make Busy
- Right-click the cell of an agent and click Agent control=>Set Employee Make Busy=>reason code. Alternatively, select the agent cell in an open monitor and click Set Employee Make Busy=>reason code from the Agent Control tab in the Contact Center Client ribbon.
To place all employees in an open Agent monitor in Make Busy
- Right-click the monitor and click Monitor control=>Set Employee Make Busy=>reason code. Alternatively, select an empty cell in an open monitor and click Set Make Busy=>reason code from the Monitor Control tab in the Contact Center Client ribbon.
- Click Yes.
REMOVING EMPLOYEES FROM MAKE BUSY - CONTACT CENTER CLIENT
Removing employees from Make Busy removes both employees and all of their agents from Make Busy.
The following procedures take place in either an open Employee monitor or an open Agent monitor in Contact Center Client.
To remove an employee in an open Employee monitor from Make Busy
- Right-click the cell of an employee whose agents are in Make Busy and click Employee control=>Remove Make Busy. Alternatively, select an empty cell in an open monitor and click Remove Make Busy from the Employee Control tab in the Contact Center Client ribbon.
To remove all employees in an open Employee monitor from Make Busy
- Right-click the cell of an employee who is in Make Busy and click Monitor control=>Remove Make Busy. Alternatively, select an empty cell in an open monitor and click Remove Make Busy from the Monitor Control tab in the Contact Center Client ribbon.
- Click Yes.
To remove an employee in an open Agent monitor from Make Busy
- Right-click the cell of an agent in Make Busy and click Agent control=>Remove Make Busy. Alternatively, select the agent cell in an open monitor and click Remove Make Busy from the Agent Control tab in the Contact Center Client ribbon.
To remove all employees in an open Agent Monitor from Make Busy
- Right-click the cell of an employee and click Monitor control=>Remove Make Busy. Alternatively, select an empty cell in an open monitor and click Remove Make Busy from the Monitor Control tab in the Contact Center Client ribbon.
- Click Yes.
PLACING EMPLOYEES IN BUSY - IGNITE (WEB)
NOTE: Agents in Work Timer can directly enter Busy/MKB or DND if the state is applied manually. Changing states from Work Timer to Busy/MKB or DND without first entering a Classification Code could register a 'Non-Compliant' against voice agents, if Classification Codes are required for the queue.
Placing an employee into Busy places them in Busy across all media types for which they answer contacts. While in Busy, they can receive transferred multimedia contacts, however, inbound multimedia contacts will not be routed to them. They can also receive non-ACD voice contacts and pick contacts waiting in queue.
The following procedure takes place in either an Agent State or Employee State monitor in Ignite (WEB).
To place an employee in Busy
- In the monitor, select the employee you want to place in Busy.
- Click State=>Busy….
- Choose a Busy code.
REMOVING EMPLOYEES FROM BUSY - IGNITE (WEB)
Removing employees from Busy re-enables them to answer inbound multimedia contacts and ACD calls.
The following procedure takes place in either an Agent State or Employee State monitor in Ignite (WEB).
To remove an employee from Busy
- In the monitor, select the employee you want to remove from Busy.
- Click State and select an alternate state. NOTE: Select Available if you want to make them available to receive contacts.
PLACING EMPLOYEES IN DO NOT DISTURB - CONTACT CENTER CLIENT
NOTE:
- If an agent on an ACD calls puts themselves into MKB or DND, Work Timer events are not received for that call.
- Agents in Work Timer can directly enter Busy/MKB or DND if the state is applied manually. Changing states from Work Timer to Busy/MKB or DND without first entering a Classification Code could register a 'Non-Compliant' against voice agents, if Classification Codes are required for the queue.
Placing employees into Do Not Disturb places employees and all of their agents into Do Not Disturb.
The following procedures take place in either an open Employee monitor or an open Agent monitor in Contact Center Client.
To place an employee in an open Employee monitor in Do Not Disturb
- Right-click the cell of an employee and click Employee Control=>Set Do Not Disturb=>reason code. Alternatively, select the employee cell in an open monitor and click Set Employee Do Not Disturb=>reason code.
To place all employees in an open Employee Monitor in Do Not Disturb
- Right-click the monitor and click Monitor control=>Set Do Not Disturb=>reason code. Alternatively, select an empty cell in an open monitor and click Set Do Not Disturb from the Monitor Control tab in the Contact Center Client ribbon.
- Click Yes.
To place an employee in an open Agent monitor in Do Not Disturb
- Right-click the cell of an agent who is logged on and click Agent control=>Set Employee Do Not Disturb=>reason code. Alternatively, select the agent cell in an open monitor and click Set Do Not Disturb=>reason code from the Agent Control tab in the Contact Center Client ribbon.
To place all employees in an open Agent monitor in Do Not Disturb
- Right-click the monitor and click Monitor control=>Set Do Not Disturb=>reason code. Alternatively, select an empty cell in an open monitor and click Set Do Not Disturb from the Monitor Control tab in the Contact Center Client ribbon.
- Click Yes.
REMOVING EMPLOYEES FROM DO NOT DISTURB - CONTACT CENTER CLIENT
Removing employees from Do Not Disturb removes employees and all of their agents from Do Not Disturb.
The following procedures take place in either an open Employee monitor or an open Agent monitor in Contact Center Client.
To remove an employee in an open Employee monitor from Do Not Disturb
- Right-click the cell of an employee who is in Do Not Disturb and click Employee control=>Remove Do Not Disturb. Alternatively, select the employee cell in and click Remove Do Not Disturb from the Employee Control tab in the Contact Center Client ribbon.
To remove all of a monitor's employees in an open Employee monitor from Do Not Disturb
- Right-click the monitor and click Monitor control=>Remove Do Not Disturb. Alternatively, select an empty cell in an open monitor and click Remove Do Not Disturb from the Monitor Control tab in the Contact Center Client ribbon.
To remove an employee in an open Agent monitor from Do Not Disturb
- Right-click the cell of an agent who is in Do Not Disturb and click Agent control=>Remove Do Not Disturb. Alternatively, select the agent cell in an open monitor and click Remove Do Not Disturb from the Agent Control tab in the Contact Center Client ribbon.
To remove all of a monitor's employees in an open Agent monitor from Do Not Disturb
- Right-click the monitor and click Monitor control=>Remove Do Not Disturb. Alternatively, select an empty cell in an open monitor and click Remove Do Not Disturb from the Monitor Control tab in the Contact Center Client ribbon.
PLACING EMPLOYEES IN DO NOT DISTURB - IGNITE (WEB)
NOTE: Agents in Work Timer can directly enter Busy/MKB or DND if the state is applied manually. Changing states from Work Timer to Busy/MKB or DND without first entering a Classification Code could register a 'Non-Compliant' against voice agents, if Classification Codes are required for the queue.
Placing an employee into Do Not Disturb places them in Do Not Disturb across all media types for which they answer contacts. While in Do Not Disturb, they are unable to receive inbound multimedia contacts and internal voice contacts, including transfers.
The following procedure takes place in either an Agent State or Employee State monitor in Ignite (WEB).
To place an employee in Do Not Disturb
- In the monitor, select the employee you want to place in Do Not Disturb.
- Click State=>Do Not Disturb….
- Choose a DND code.
REMOVING EMPLOYEES FROM DO NOT DISTURB - IGNITE (WEB)
Removing employees from Do Not Disturb re-enables them to receive contacts for all applicable media types.
The following procedure takes place in either an Agent State or Employee State monitor in Ignite (WEB).
To remove an employee from Do Not Disturb
- In the monitor, select the employee you want to remove from Do Not Disturb.
- Click State and select an alternate state. NOTE: Select Available if you want to make them available to receive contacts.
CANCELING WORK TIMER FOR EMPLOYEES - CONTACT CENTER CLIENT
NOTE: Agents in Work Timer can directly enter Busy/MKB or DND if the state is applied manually. Changing states from Work Timer to Busy/MKB or DND without first entering a Classification Code could register a 'Non-Compliant' against voice agents, if Classification Codes are required for the queue.
In an Employee monitor or Agent monitor, you can cancel Work Timer for one or more employees. The following procedures take place in either an open Employee monitor or an open Agent monitor in Contact Center Client.
To cancel Work Timer in an open Employee monitor
- Right-click the cell of an employee who is in Work Timer and click Employee control=>Cancel Work Timer. Alternatively, select the employee cell in an open monitor and click Cancel Work Timer in the appropriate media section of the Employee Control tab in the Contact Center Client ribbon.
To cancel Work Timer for all employees in an open Employee monitor
- Right-click the monitor and click Monitor control=>Cancel Work Timer. Alternatively, select an empty cell in an open monitor and click Cancel Work Timer in the media type's section of the Monitor Control tab in the Contact Center Client ribbon.
To cancel Work Timer for an employee in an open Agent monitor
- Right-click the cell of an agent who is in Work Timer and click Agent control=>Cancel Work Timer. Alternatively, select the agent cell in an open monitor and click Cancel Work Timer from the Agent Control tab in the Contact Center Client ribbon.
To cancel Work Timer for all employees in an open Agent monitor
- Right-click the monitor and click Monitor control=>Cancel Work Timer. Alternatively, select an empty cell in an open monitor and click Cancel Work Timer from the Monitor Control tab in the Contact Center Client ribbon.
CANCELING WORK TIMER FOR EMPLOYEES - IGNITE (WEB)
NOTE: Agents in Work Timer can directly enter Busy/MKB or DND if the state is applied manually. Changing states from Work Timer to Busy/MKB or DND without first entering a Classification Code could register a 'Non-Compliant' against voice agents, if Classification Codes are required for the queue.
The following procedure takes place in either an Agent State or Employee State monitor in Ignite (WEB).
To remove an employee from Work Timer
- In the monitor, select the employee you want to remove from Work Timer.
- Click State and select an alternate state. NOTE: Select Available if you want to make them available to receive contacts.
CANCELING THE RESEIZE TIMER FOR EXTERNAL HOT DESK AGENTS
If an external hot desk user is unavailable and the ACD path attempts to deliver a call to them the ACD routing system will initiate the Reseize Timer, preventing further ACD call delivery attempts until the timer expires or is canceled by the agent or supervisor. Value settings for reseize timers are a minimum of four seconds, a default of 180 seconds, and a maximum of 60 minutes. These values are configured on the ACD routing system. When an agent is in the Reseize Timer state, the applicable real-time monitors in Contact Center Client display the Make Busy icon as well as text denoting the agent's current state as 'Reseize Timer'.
The following procedures take place in either an open Employee monitor or an open Agent monitor in Contact Center Client.
To cancel Reseize Timer for an employee's voice agent in an open Employee monitor
- Right-click the cell of an employee who is in Reseize Timer and click Employee control=>Cancel Reseize Timer. Alternatively, select the employee cell in an open monitor and click Cancel Reseize Timer in the appropriate media section of the Employee Control tab in the Contact Center Client ribbon.
To cancel Reseize Timer for all employee voice agents in a monitor in an open Employee monitor
- Right-click the monitor and click Monitor control=>Cancel Reseize Timer. Alternatively, select an empty cell in an open monitor and click Cancel Reseize Timer from the Monitor Control tab in the Contact Center Client ribbon.
To cancel Reseize Timer for an employee's voice agent in an open Agent monitor
- Right-click an agent who is in Reseize Timer and click Agent control=>Cancel Reseize Timer. Alternatively, select the agent cell in an open monitor and click Cancel Reseize Timer in the appropriate media section of the Agent Control tab in the Contact Center Client ribbon.
To cancel all of the voice agents on a monitor in the Reseize Timer state in an open Agent monitor
- Right-click the monitor and click Monitor control=>Cancel Reseize Timer. Alternatively, select an empty cell in an open monitor and click Cancel Reseize Timer from the Monitor Control tab in the Contact Center Client ribbon.
EXTENSION CONTROL
Using Interactive Contact Center and Contact Center Client, you can control extensions on the following monitors:
- Extension State by Position
- Extension Now
Extension Control gives you control over individual extensions. Monitor Control gives you control over all the extensions on a monitor. All of the extensions on the monitor are affected by the action you take. You can perform actions using either a right-click and select method within the monitor or by selecting an extension or an empty cell (monitor control) and accessing the action menu in the Extension or Monitor Control tabs in the ribbon. (See Figure 49.)

Figure 49: Extension State by Position - Extension Control tab
RING GROUP PRESENCE
If you are licensed for Ring Groups, extensions can join and leave Ring Groups via Interactive Contact Center.
Extensions can be assigned to multiple Ring Groups. Within a Ring Group, an extension can be set to Present, enabling it to receive calls, or Absent, ensuring that calls are not offered to the extension. By default, extensions are set to Present. Supervisors can manually change the extension presence in Contact Center Client.
JOINING AND LEAVING RING GROUPS
Interactive Contact Center can be used to control the presence of extensions in Ring Groups.
The following procedures take place in an open Extension monitor in Contact Center Client.
To join an extension to or remove an extension from a Ring Group
- Right-click the cell of an extension and click Extension control=>Join/Leave. Alternatively, select the cell of an extension and in the Extension Control tab of the Contact Center Client ribbon, click Join/Leave.
- Select the Ring Group(s) to which you want the extension to join or deselect the Ring Group(s) to have the extension leave the Ring Group(s).
- Click OK.
PLACING AN EXTENSION IN DO NOT DISTURB
The following procedures take place in an open Extension monitor in Contact Center Client.
To place an extension in Do Not Disturb
- Right-click the cell of an extension and click Extension control=>Set Do Not Disturb=>reason code. Alternatively, select the Extension Control tab and select Set Do Not Disturb=>reason code.
To place all extensions into Do Not Disturb in an open monitor
- Right-click the cell of an extension and click Monitor control=>Set Do Not Disturb=>reason code. Alternatively, select the Monitor Control tab and select Set Do Not Disturb=>reason code.
- Click Yes.
REMOVING AN EXTENSION FROM DO NOT DISTURB
The following procedures take place in an open Extension monitor in Contact Center Client.
To remove an extension from Do Not Disturb
- Right-click the cell of an extension in Do Not Disturb and click Extension control=>Remove Do Not Disturb. Alternatively, select the Extension Control tab and select Remove Do Not Disturb.
To remove all extension from Do Not Disturb in an open monitor
- Right-click the cell of an extension and click Monitor control=>Remove Do Not Disturb. Alternatively, select the Extension Control tab and select Remove Do Not Disturb.
QUEUE CONTROL
You can manually place queues in or out of Do Not Disturb using the Queue Now monitor in Contact Center Client.
Queues can be automatically set to open and close or go in and out of Do Not Disturb using queue schedules and queue control plans. These are administrative settings. For more information see the MiContact Center Installation and Administration Guide.
MANUALLY CONTROLLING QUEUES
Queue control enables you to control individual queues. Monitor control enables you to control all of the queues on a monitor.
The Monitor Options tab displays in the ribbon for the Queue Now monitor. You can perform actions using either a right-click and select method in the open monitor or by accessing the action menu in the Monitor Options ribbon. (See Figure 50.)
NOTE: Manual queue control overrides administrative settings for queue schedules and queue control plans.
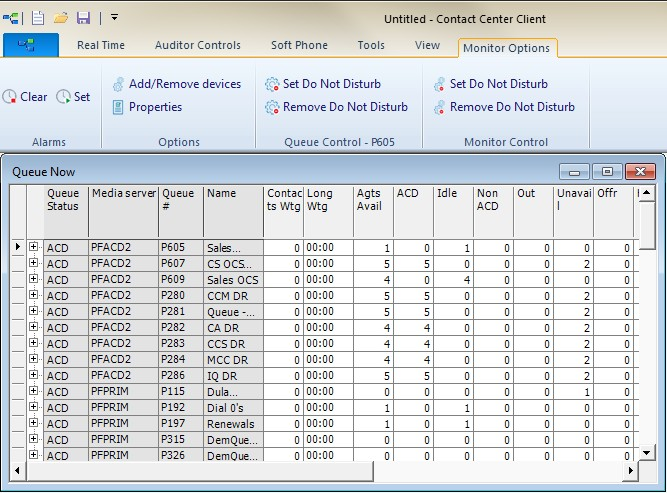
Figure 50: Queue Now monitor • Monitor Options tab
Placing queues in Do Not Disturb
Using manual queue control, you can place queues in and remove queues from Do Not Disturb on the Queue Now monitor. A contact will not enter a queue that is in Do Not Disturb. Instead the contact is sent to an unavailable answer point if one is configured for the queue.
NOTE: Putting a Ring Group into Do Not Disturb removes the presence of all of its members.
To place a queue in Do Not Disturb
- Right-click the cell of an active queue and click Queue control=>Set Do Not Disturb. Alternatively, select the queue in an open Queue Now monitor and click Set Do Not Disturb from the Monitor Option tab in the Contact Center Client ribbon. See Figure 51.
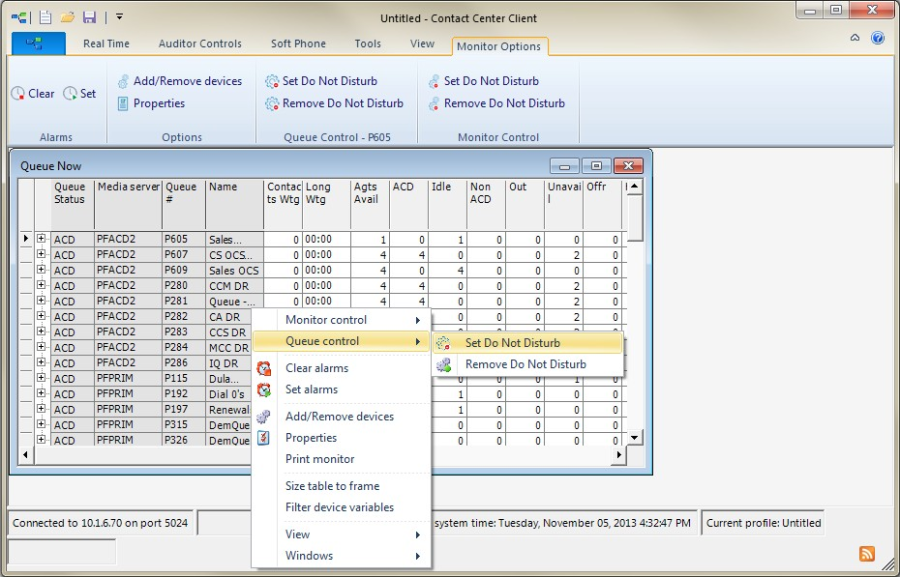
Figure 51: Placing a queue in Do Not Disturb
To place all of the queues on a monitor in Do Not Disturb
- Right-click the monitor and click Monitor control=>Set Do Not Disturb. Alternatively, select an open Queue Now monitor and click Set Do Not Disturb from the Monitor Option tab in the Contact Center Client ribbon.
Removing queues from Do Not Disturb
To remove a queue from Do Not Disturb
- Right-click the cell of a queue that is in Do Not Disturb and click Queue control=>Remove Do Not Disturb. Alternatively, select the queue in an open Queue Now monitor and click Remove Do Not Disturb from the Monitor Option tab in the Contact Center Client ribbon.
To remove all of the queues on a monitor from Do Not Disturb
- Right-click the monitor and click Monitor control=>Remove Do Not Disturb. Alternatively, select an open Queue Now monitor and click Remove Do Not Disturb from the Monitor Option tab in the Contact Center Client ribbon.