MiVoice Business Console - Manual
Document Going over Basic Console Settings to ensure user receives calls. Click here for full manual
Audio Panel - Selecting the Audio Device
Operator Status
Present Status
To receive incoming calls, set your console to present State. This action assigns an operator license for the time that you use the console.
To set the Operator Present
- Click the drop-down menu arrow beside the Operator Status button.
- Click Operator Present

You will hear a confirmation tone on the conversation device.
To obtain an operator license from another operator
At times, all licenses may already be in use. A dialog will be displayed that allows you to obtain a license from another operator.
- Select a Name from the list of currently active operators.
- Click Force Absent.
This action sets this console to Operator Present ![]() and the other one to Operator Absent
and the other one to Operator Absent ![]() . If there is only one operator present, the system will not be put into Night Service when the other operator is forced absent.
. If there is only one operator present, the system will not be put into Night Service when the other operator is forced absent.
To set the Operator Absent
- Click the drop-down menu arrow beside the Operator Status button.
- Click Operator Absent
 .
.
When you activate Operator Absent, all new and waiting calls to your directory number (DN) continue to ring other available consoles that are configured with the same softkey DN.
Calls on hold and parked calls can be retrieved and handled normally. If there are no available consoles for new or waiting calls, or if held or parked calls time out, the calls are automatically rerouted to programmed destinations. You can still originate calls when you are absent.
The table below describes the various states of Operator Status.

Set Day and Night Service
To change the service mode
- Click the drop-down menu arrow beside the Day/Night Service button.
- Select Day Service
 ,Night Service 1
  , or Night Service 2
  .
.
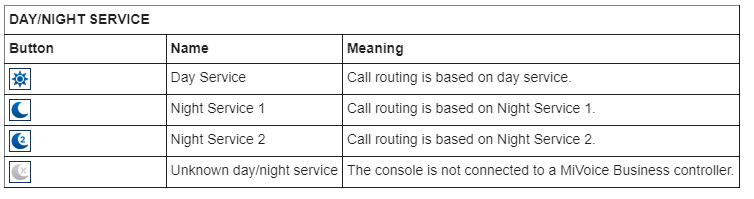
Note: If the last available operator console has not processed a call after the programmed time-out period (the default is 10 minutes), the console changes to Operator Absent status. If that operator console is the last active operator, the system automatically goes into Night Service1 (![]() ) mode.
) mode.
Ring ON or OFF
To turn the ring of or off
- Click the drop-down menu arrow beside the Ringer Status button.
- Select Ringer On
 or Ringer Off
 .
.

Note: When the ringer is off, the Incoming Calls display and the Call Waiting indicator (that is, the color of the softkey associated with each call) provide the only indications that you have calls waiting. See Incoming Calls display and Call Waiting/Line area for more details.
Managing Audio
Manage Audio on the PC
Important: To ensure that the ringer will be audible in the case of emergency calls, do not mute the volume in the Windows Sound Panel or turn the volume off on the speaker itself.
You will hear calls ringing on your configured ringer or headset. The table below describes the Audio icons.
Note: If you are using a Digital Enhanced Cordless Telecommunications (DECT) headset or handset with Wideband audio and experience a delay in audio when you answer a call, you may need to configure your audio device for Narrowband operation. Refer to the device manufacturer's document for instructions.

You may have one or more audio devices configured. If two devices are configured, indicated by the ![]() icon, the 2nd device can be used as a listening device, typically used by a supervisor to monitor a new operator during training.
icon, the 2nd device can be used as a listening device, typically used by a supervisor to monitor a new operator during training.
You can also use the 2nd device as a backup device, if your primary devices fails. The other device will automatically switch to conversation mode.
Selecting your audio device
- Choose the device you want to use for calls.
- Ensure the audio device you want to use is available from the
 audio drop down list. A checkmark indicates the selected device.
 - If your audio device isn't listed, plug in the device, and then select it in the Audio Panel.
A confirmation tone is played in the conversation device when:
- when you set your console Present
- when you select a different device from the
 audio drop down list
Test your audio device
Click

Click Audio Panel.
Select the Audio Device Selection tab.
Click the Test button and listen for the test tone to ensure that you have the correct headset connected.
Plugging/Unplugging Your Audio Device
Unplugging the headset from the console automatically enables the other device if it is plugged in. If neither is plugged in, the console changes to Operator Absent status. Or, if you are the last active operator, the system goes into Night Service1 ( ) mode. Plugging the headset back in, does not automatically change the Operator status back to Present status.
Audio Panel
Use this dialog box to set up the headset and/or handset audio devices and ringer device, and select the ring tone for incoming calls.
To access the audio panel
Click
OR and select Audio Panel.
Select Audio from the Tools menu.
Selecting the Audio Devices
The Audio Device Selection tab allows you to select headset or handset devices that have both a playback and sound recording device (that is, a device with both a microphone and speaker in it). Devices that provide a speaker can be selected as a ringer device.
You can adjust the Speaker and Ringer volume as well as test the devices using this screen.
See Manage Audio on the PC before adjusting these settings.
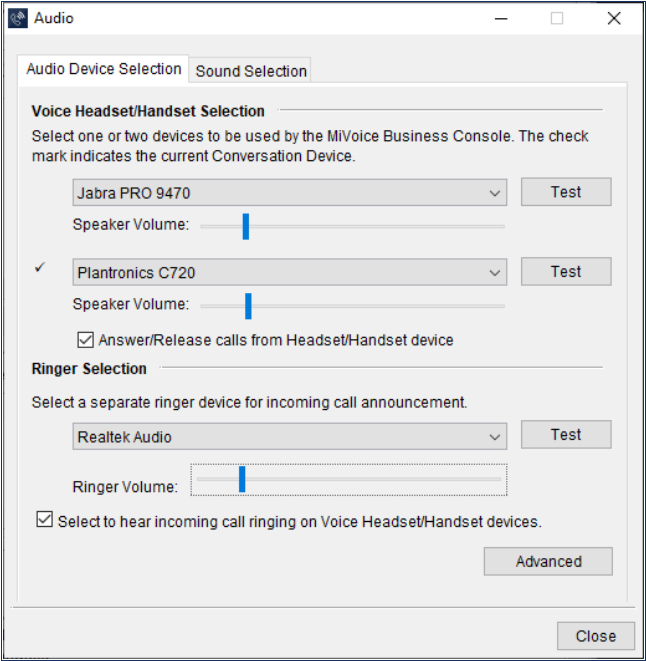
To select a Handset/Headset or ringer device
Click the Audio Device Selection tab.
Click the drop-down menu.
Select the device.
Select the Answer/Release calls from Headset/Handset device option.
Adjust the Speaker or Ringer Volume.
Press Test to test the volume.
Click Close.
Note: Some audio devices have multiple speakers and/or microphones. If you experience audio issues with a device, use the Advanced option in the audio panel to select a different speaker and/or microphone.
The first headset or handset device selected will be used as the conversation device. The second headset or handset device selected will be the listener device. A check appears beside the conversation device.
You can switch to a different conversation device using the Audio button ![]() on the toolbar.
on the toolbar.
To answer and release calls from your Handset/Headset device
Select the Answer/Release calls from Headset/Handset device checkbox to answer/release calls from your handset or headset device.
For more information on the devices supported, see Headset Button Control.
To enable ringing on the voice Handset/Headset device(s)
Select the checkbox to hear incoming calls ringing on the voice handset or headset device.
Ringing plays on the headset or handset device for incoming calls only. Ringing is not applied while you are in a call.
Emergency ringing is applied to the ringer device and an emergency notification tone is applied to the headset or handset device if the option to hear incoming calls ringing on the headset or handset device is enabled.
Ringer volume settings only apply to the ringer device.
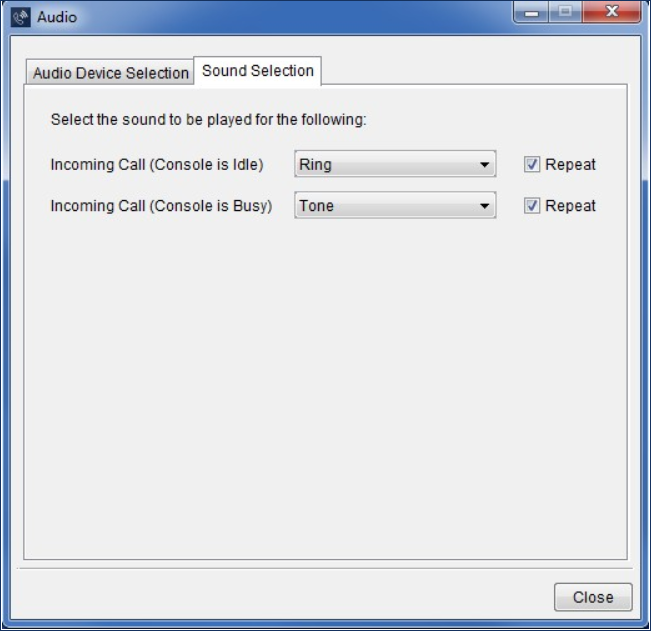
Selecting Sound Options
The Sound Selection tab allows you to select the sound to be played for Incoming Calls:
Incoming call (Console is idle) — the sound is played to all programmed Audio devices, including the headset, backup headset, and ringer.
Incoming call (Console is busy) — the sound is played on the ringer device only.
The sound options are Ring, Tone, or None.
It is recommended that you select the Repeat checkbox for Incoming Calls if you are using a wireless headset because connection delays may cause you to miss the first few seconds of sound during an incoming call.
Check your headset manufacturer documentation because most wireless headsets have configurable options to minimize these delays.
To select a sound option
Click the Sound Selection tab.
Click the drop-down menu and select the sound for Incoming call (Console is idle).
Click the drop-down menu and select the sound for Incoming call (Console is busy).
Select the Repeat check box to have the sound repeated more than once.
Click Close.
Turn Console Ringer On or Off
The status of the ringer is indicated in the Operator Status area.

To turn the ringer on or off
Click the drop-down menu arrow beside the Ringer Status button.
Select Ringer On
or Ringer Off .
.
Important: If the ringer is turned off, an emergency call will override and ring the ringer device.
Headset Button Control
You can use the Answer/Release buttons on Jabra™ and Plantronics™ headsets to answer and release calls. Volume and Mute are still controlled by the console. The mute on the headset will mute the call at the headset and will not mute the console application. The volume control from the headset will adjust the volume within the console application.
An option is enabled on the Audio Panel that allows the Answer/Release buttons to work on your headset. For more information, see Audio Panel.
Headsets Supported
USB wired/wireless or Bluetooth headsets from Plantronics are supported.
USB wired/wireless headsets from Jabra are supported. Bluetooth support is not available.
Limitations
Multiple headset devices plugged into the PC can cause unpredictable answer/release button behavior.
If you are using a Plantronics headset for your console, ensure only one Plantronics headset is plugged into the PC. If you need a second headset, a Jabra headset is recommended.
You may use two Jabra headsets, however they must be different models.