Your Personal Call Path
Your Personal Call Path
This is located on the Call Director Tab.

With Call Director, you can create an automated attendant application (known as a call flow) to handle your calls when you can't answer personally.
A call flow is a collection of call-processing actions programmed by the call flow owner to control how an incoming call is handled. Call flow owners can be either the end user of the phone, or the System Administrator. The end user programs personal call flows, which are associated with their own voice mailboxes.
Call flows actions:
Play a message,
Perform a call transfer (blind, supervised, or screened) to an extension or external phone,
Forward a call to a specified voice mailbox,
Send the caller to the dial-by-name application, or
Hang up.
There are five system templates provided with the Call Director functionality. These templates can be used as a starting point when creating a call flow.
The five system templates are as follows: Daily Greeting, Follow Me, Find Me, Personal Dial Zero and Alternate Daily Greeting.
To select a template for the call flow:
- From the Edit menu on the call flow page, click Start with Template.
- A window with the list of available templates appears. Select the template you want to use for the call flow.
- Click OK.
Personal Dial Zero Template
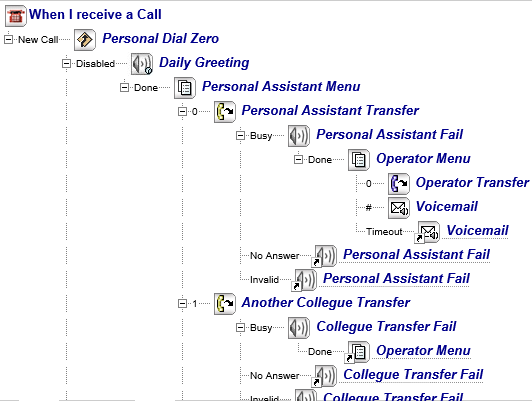

Daily Greeting Template
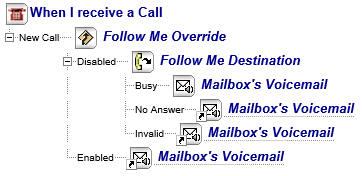
Follow Me Template
NP Receptionist Template
Find Me Template

Call Flow Actions
Adding an action
Adding an action is done by assigning a new action to a result of an existing action. All call flows begin with the When I receive a call action. There are no restrictions on the number and order of actions in call flow. The same action can be used more than once.
To add an action to a call flow:
Click on "When I receive a call" (default initial action)...if using a template, click on the Action you want to change.
In the action’s Results area, click a link representing a result (there may be more than one).
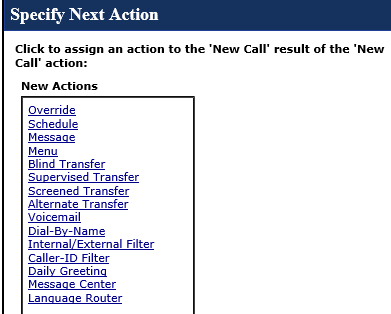
From the New Actions menu that appears, select the desired action type.
The new action item is added to the Call Flow display area and automatically selected.
Program the desired properties for the new action. At this point you can either assign actions to the results of the new action, or return to the original action and assign actions to its unassigned results. To create a call flow with multiple instances of an action, each with unique properties, assign the actions different names.
Click Save.

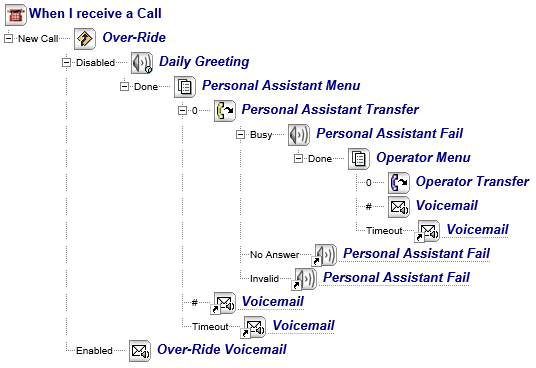
Override
When an Override action is encountered, Call Director checks to see if it is enabled. If it is not, the call flow follows the Disabled result. If Override is enabled, Call Director performs the action connected to the Enabled or From Call Flow results (typically a transfer to another extension, a voice mailbox, or the attendant). Override can be turned on and off in Call Director or from any DTMF telephone.
To program the Override action:
On the Call Flow page, add the Over-Ride action to the call flow.
Under When I receive a Call, click the Override action listed in the call flow. The action's Properties and Results appear at the bottom of the page.
Enter or modify the properties as needed. For information, see the table above.
Assign actions as required to the Enabled and Disabled results from the call flow and/or Extended Absence if applicable.
Click Save.
Schedule
The Schedule action alters the call flow based on the user’s weekly schedule and, optionally, on the user’s holiday schedule.
The Weekly Schedule checks the time-of-day and day-of-week of each call. It then redirects the call according to the programmed Call Flow Action for that time and day. For example, a call flow owner can have all calls ring his extension during normal working hours, Monday through Friday. After hours and on weekends, all calls can be routed to the owner’s voice mailbox.
The Holiday Schedule checks the time-of-day and day-of-year of each call. If the call falls within a predefined Holiday range, Call Director moves the caller to the next action in the call flow for further processing.
A Weekly Schedule can have an unlimited number of time slots, with a minimum one-minute difference required between the set times. For example, the call flow owner can set their work hours for Monday through Friday as 9:00a.m. to 12:00p.m., 1:00p.m. to 2:30p.m. and 3:00p.m. - 5:00p.m.
A call flow can have multiple schedules inserted at any point in the flow.
To program the Schedule action:
On the Call Flow page, add the Schedule action to the call flow.
Under When I receive a Call, click the Schedule action listed in the call flow. The action's Properties and Results appear at the bottom of the window.
Do one or both of the following:
To configure a weekly schedule, click Weekly Schedule. The Weekly Schedule window opens.
To configure a holiday schedule, click Holiday Schedule. The Holiday Schedule window opens.
If the window fails to appear, check to see whether your browser is using a pop-up blocker.Enter or modify the schedule as needed. Click Apply and then OK to save the information, and to return to the Call Flow main page.
Assign actions as required to the On-hours and Off-hours results.
Click Save.
Message
The Message action plays recorded audio, such as a greeting to callers. Messages play once before moving the caller down to the next action in the call flow.
To program a Message action:
- On the Call Flow page, add the Message action to the call flow.
- Under When I receive a Call, click the Message action listed in the call flow. The action's Properties and Results appear at the bottom of the window.
Note: If you select the Suppress Mailbox Greeting option for a Call Flow, a caller will not hear your mailbox greeting if the call is handled through Call Director. The caller will, however, still hear the greeting if the call goes through the message center. - Enter or modify the properties as needed.
- Assign an action as required to the Done result.
- Click Save.
Menu
The Menu action is a recording that presents options to an incoming caller. The recorded Menu prompts callers to press a key on their telephone keypad to select a menu option. For example, an incoming call answered by the Menu could tell the caller, "If you know the extension of the person you wish to reach, enter it now. To speak to the sales desk, press 2. To speak to an attendant, press 0." The caller must then press the desired key on their phone's keypad, or hang up.
To program a Menu action:
On the Call Flow page, add the Menu action to the call flow.
Under When I receive a Call, click the Menu action listed in the call flow. The action's Properties and Results appear at the bottom of the window.
Enter or modify the properties as needed, assigning keys to voice prompts.
Assign actions as required to the DTMF, timeout, and error results.
Click Save.
Call Transfers
A Transfer action routes the caller to a specified destination, such as an extension, the attendant, or an external telephone number.
Whenever you select a transfer Action, you can also define the transfer method as well as the subsequent incomplete transfer Action to take if the original transfer was incomplete (for example, a Ring Busy, Ring No Answer, or Invalid).
There are four types of call transfers: Blind Transfer, Supervised Transfer, Screened Transfer, and Alternate Transfer
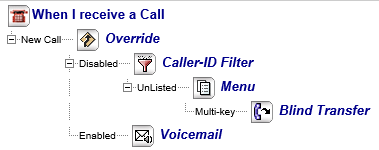
Blind Transfers
A Blind Transfer dials the destination and then releases the call regardless whether the destination is busy or not answering.
With Call Director, the Blind Transfer action transfers a call to one of the following destinations, as configured by the call flow owner:
An extension specified in the action properties;
The Attendant/Operator extension;
The extension stored as Gathered Digits during a previous Menu action that has a multi-key result.
Supervised Transfer
A Supervised Transfer waits for the called party to answer before completing the transfer. If the call is not answered or the called party is busy, it returns to the call flow for further processing.
The Supervised Transfer action transfers a call to one of the following destinations, as configured by the call flow owner:
An extension specified in action properties;
The Attendant/Operator extension;
The extension stored in the Gathered Digits during a previous Menu action that has a multi-key result.
The Attendant extension configured in the user mailbox
The Operator extension
Screened Transfer
A Screened Transfer is similar to a Supervised Transfer, except that the caller's name is first recorded and then played back to the called person. The called person has the option to accept or reject the call.
The Screened Transfer action transfers a call to one of the following destinations, as configured by the call flow owner:
An extension specified in action properties;
The extension stored in the Gathered Digits during a previous Menu action that has a multi-key result
Alternate Transfer
An Alternate Transfer is used to route calls to an external destination, such as a cell phone or pager, and for text messaging. The destination is defined by the dial string sequence, which can include commands that permit complete control of the outgoing call, including:
Dial tone detection
Call answer supervision
Dialing DTMF keys
Inserting pauses
To program a Call Transfer action:
On the Call Flow page, add a call transfer action (i.e. Blind Transfer, Supervised Transfer, Screened Transfer, or Alternate Transfer) to the call flow.
Under When I receive a Call, click the call transfer action listed in the call flow. The action's Properties and Results appear at the bottom of the window.
Enter or modify the properties as needed.
Assign actions as required to the transfer results.
Click Save.
Voicemail
The Voicemail action sends the caller to a mailbox. Normally the call is sent to a specific mailbox, but by using the multi-key result of a Menu action the call can be sent to a caller-specified mailbox. If the mailbox is not specified, then the call is sent to the mailbox of the call-flow owner.
To program a Voicemail action:
On the Call Flow page, add the Voicemail action to the call flow.
Under When I receive a Call, click the Voicemail action listed in the call flow. The action's Properties and Results appear at the bottom of the window.
Enter or modify the properties as needed.
Click Save.
Dial-by-Name
The Dial-by-Name action sends the caller to the Dial-by-Name application which matches the telephone keypad equivalent of the spelled names of mailbox owners (as entered by the caller) with their mailbox and extension numbers.
To program a Dial-by-Name action:
On the Call Flow page, add the Dial-by-Name action to the call flow.
Under When I receive a Call, click the Dial-by-Name action listed in the call flow. The action's Properties and Results appear at the bottom of the window.
Enter or modify the properties as needed.
Click Save.
Internal/External Call Handling
The Internal/External action allows you handle internal calls one way and external calls another—for example, when you're on the phone, internal calls could go to your mailbox and external calls could go to your cell phone.
To program an Internal/External action:
On the Call Flow page, add the Internal/External Filter action to the call flow.
Assign actions to the results as required.
Click Save.
Caller ID Filter
The Caller ID Filter action handles calls based on whether the caller's number is in your Caller ID list. You can use this action, for example, to transfer calls from home to your cell phone instead of your extension. That way, your family can reach you when your extension is busy or when you're away from your desk. The list can contain up to twenty Caller ID entries.
To program a Caller ID action:
On the Call Flow page, add the Caller-ID Filter action to the call flow.
Under When I receive a Call, click the Caller-ID Filter action listed in the call flow.
Use the Add and Remove buttons to manage your list of caller IDs. You can add up to twenty entries to the list.
Assign actions to the results as required.
Click Save.
Daily Greeting
When a Daily Greeting action is encountered in the call flow, your recorded daily greeting is played.
There are two types of Daily Greeting: Today's Daily Greeting or Default Daily Greeting. Today's Daily Greeting allows users to personalize their greeting on a daily basis with a temporary greeting that will revert at midnight back to the user's Default Daily Greeting, or, if that is not recorded, to their Primary Personal Greeting.
To program a Daily Greeting action:
On the Call Flow page, add the Daily Greeting action to the call flow.
Under When I receive a Call, click the Daily Greeting action listed in the call flow. The action's Properties and Results appear at the bottom of the window.
Enter or modify the properties as needed.
Assign an action as required to the Done result.
Click Save.
Message Center
A Message Center node has been created to allow a call to end up in the message center. This node is the default destination when the voice mailbox is not specified.
The new Message Center node only has its name as a property. Like the Voicemail node, the Message Center node is a termination action meaning that there are no branches from this node.
To program a Message Center action:
On the Call Flow page, add the Message Center action to the call flow.
Under When I receive a Call, click the Message Center action listed in the call flow. The action's Properties and Results appear at the bottom of the window.
Enter or modify the properties as needed.
Click Save.
Language Router
The Language Router action enables users to take advantage of the "Multilingual Service" feature for system prompts. When users first reach the Message Center or Receptionist application, they are prompted to choose between multiple languages (for example, English, French or German). Thereafter, they will receive prompts only in the language they have selected.
To program the Language Router action:
On the Call Flow page, add the Schedule action to the call flow.
Under When I receive a Call, click the Language Router action listed in the call flow. The action's Properties and Results appear at the bottom of the window.
Assign actions as required to the Language_1 and Language_2 to Language_5 results.
Select "Auto" as the Prompt language for the call flow.
Click Save.
Return to the MiCollab End User Portal Main Menu