USING THE MITEL CORDLESS HANDSET 5360
The cordless handset provides office mobility, allowing you to make and answer calls while away from your desk. Replacing the standard corded handset, the cordless handset contains a rechargeable battery that charges in the handset cradle when not in use.
To use the cordless handset (whether DECT or Bluetooth), you must pair the handset with the phone. For details, see Pairing the Cordless Module and Accessories on page .

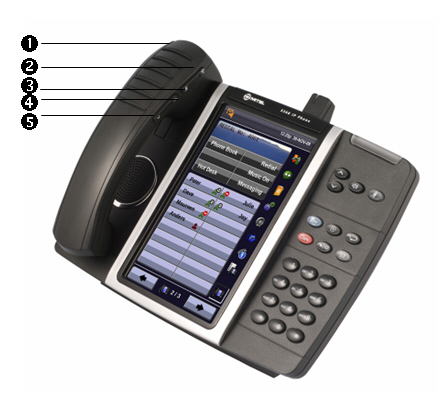
Cordless Handset on a 5360 IP Phone
Elements of the Cordless Handset
Feature | Function |
1) Cordless Handset LED | Blue: Light-emitting diode (LED) indicating the status of the handset. |
2) Hookswitch Button | Lifting the handset from the cradle activates the handset. If the handset is already out of the cradle, pressing the hookswitch takes the handset off-hook. Pressing the hookswitch again returns it to on-hook. |
3) Mute button | Mute allows you to turn the microphone off during a call. |
4) Volume Up and 5) Volume Down buttons | Up and Down provide volume control for the ringer and handset/headset. |
| Note: To return to a corded handset, you must first unpair the cordless handset. |
Answer a Call
Do one of the following:
- Lift the cordless handset.
- If the handset is already out of the cradle, press the hookswitch button on the handset.
| Note: If you have a call on hold on your Prime Line and answer another on a Line Appearance key, it will be presented over the speaker. |
Hang up
Do one of the following:
- Replace the cordless handset in the cradle.
- Press the hookswitch button on the handset.
Dialing – Auto Dial Disabled
To dial a number with Auto Dial disabled:
- Lift the handset or press the hookswitch.
- Make the call using the dial pad, or press a programmed speed dial key on the phone.
Dialing – Auto Dial Enabled
To dial with Auto Dial enabled:
- To dial the predefined Auto Dial number, press the hookswitch on the cordless handset.
To program Auto Dial, refer to Auto Dial on page .
Handset Alerting Tones and LEDs
The handset provides the following alerting tones:
Feature | Function |
Mute key on cordless device ON/OFF | 2-pitch tone occurs immediately. Reminder tone occurs 30 seconds after activation and then regularly until deactivated. |
Mute key on Phone ON/OFF | Immediate tone with Bluetooth; no immediate tone with DECT. Reminder tone occurs 30 seconds after activation and then regularly until deactivated. |
Low battery (within 10 minutes left for DECT and within 20 minutes left for Bluetooth) | 3 beeps and 20 second pause repeated 3 times |
Low battery (within 2 minutes left) | 3 rapid beeps and 1.5 second pause repeated 3 times |
Out of range | DECT: Repetitive 3-pitch tone until you are back in range. Note: If you are out of range for more than 10 seconds, any call that is in progress is dropped and not recovered. |
| Note: Audio indications are heard in the handset only when it is in use and may interrupt voice transmission. |
The handset has two LEDs:
- Blue – indicates the operational status of the handset
- Green – indicates the status of the electrical charge of the battery
LED Color | LED State | Indicates |
|---|---|---|
Blue | Solid | Handset is muted |
| Blinking | Handset is in pairing mode |
| Winking | Active audio path between Handset and Module |
| Off | No audio path between Handset and Module OR |
| Solid for 2 seconds | Pairing is successful. |
Green | Solid | Battery is fully charged |
| Blinking | Battery is charging. Note: It is normal for the handset LED to cycle between blinking and solid as battery charge is maintained. |
| Off | When handset is cradled and the LED does not flash or illuminate, this indicates an absence of battery power. During the first 30 – 60 minutes that the light is off, the battery may be trickle charging. If that is the case, the LED will resume normal behavior within that 60 minute period. If the LED remains off for more than 60 minutes, then either the battery is no longer chargeable or there is a problem in the charging circuit. |
Blinking: LED is On and Off for equal amount of time Winking: LED is On for a short period of time and Off for a longer period


