Using Other Features on the 5360
Account Codes
An account code is a series of digits that you assign to your calls, usually for accounting purposes. The code identifies the account in the call records that your system generates. A forced account code is usually entered from another extension, enabling you to use features or make calls that the extension otherwise could not. If you want this feature enabled on your phone, ask your System Administrator.
To use Account Codes:
- Lift the handset.
- Dial the Account Code digits.
- Press #.
To enter an Account Code during a call:
- Press Superkey (must be programmed to a key).
- Select Account Code.
- Dial the Account Code digits.
- Press the Save softkey.
- Do one of the following:
- For a verified account code, press the Yes key.
- For a non-verified account code, press the No key.
ACD
If your phone is ACD-enabled, you can log in as an agent. When there is no agent logged onto an ACD-enabled set, LOGGED OUT is displayed.
To log in as an ACD agent:
- Press Superkey.
- Press Yes.
- Enter your Agent ID, using the key pad.
- Press Enter. The text, LOGGED OUT disappears.
Attendant Call Hold - Remote Retrieve
To retrieve a call placed on Hold by the attendant:
- Lift the handset.
- Dial the appropriate feature access code.
- Dial the digits announced by the attendant.
Callback
The Callback feature allows you to be notified when a busy phone becomes free or when a phone has been used after a no-answer condition was encountered.
To request a Callback when you reach a busy or unanswered station:
- Press Call Me Back.
- Hang up.
When the party is available, your phone starts ringing, and the display shows the Callback ringing indicator.
To answer a Callback:
- When you see the Callback ringing indicator, lift the handset, or press the Float Key (flashing with the calling party's name label; see page ).
Call Forward - Remote (I'm Here)
To forward calls from a remote station to your current location:
- Press Superkey (must be programmed to a key).
- Press the No softkey until "Call Forwarding?" appears.
- Press the Forwarding softkey.
- Press the Next softkey until "I Am Here" appears.
- Press the To Me softkey.
- Dial the extension of the remote station. If you make an error while dialing, use the <— softkey to backspace and correct the number.
- Press
 (DOWN) or the Save softkey.
To cancel Call Forward – Remote from the station that set the remote forwarding:
- Lift the handset.
- Dial the appropriate feature access code.
- Dial the extension of the remote station.
- Hang up.
To cancel Call Forward – Remote from the station that was forwarded:
- Press Superkey (must be programmed to a key).
- Press the No softkey until "Call Forwarding?" appears.
- Press the Forwarding softkey.
- Press the Review softkey.
- Press the Change Key softkey.
- Press the Turn FWD Off softkey.
- Press Superkey (must be programmed to a key).
Call Forward - End Chaining
To ensure that calls do not get forwarded again by the destination number:
- Lift the handset.
- Dial 64.
- Hang up.
To again allow calls to be forwarded by the destination number:
- Lift the handset.
- Dial the appropriate feature access code.
- Hang up.
Call Forward - Forced
To force an incoming call to be forwarded:
- Press the Forward softkey.
Call Forward - Override
To override Call Forward and ring a station:
- Lift the handset.
- Dial the appropriate feature access code.
- Dial the extension number.
Call Park
The Call Park feature allows you to place a call in a special hold state. You, or someone else, can then retrieve the call from any extension in the system.
After parking the call, the system can automatically connect you to paging equipment so that you can announce the call to the requested party.
To park an active call:
- Do one of the following:
- Press the Call Park feature key (must be programmed)
- Press
 (TRANS/CONF), and then dial the appropriate feature access code. The display shows PARKED@, followed by the park destination and parking spot index (if applicable). Example: PARKED@ 1234 @ 02.
- Dial the directory number on which to park the call (not required if the number is programmed to the Call Park feature key).
- To inform a user that a parked call is waiting, do one of the following:
- If automatic paging is enabled, announce the call and the park retrieve digits shown on the display.
- If automatic paging is disabled, press the programmed Page key, or dial the appropriate feature access code, followed by the Paging zone number (if required). Then, announce the call and park retrieve digits shown on the display.
| Note: Paging over a loudspeaker is not permitted in handsfree mode; you must use the handset or headset. |

To retrieve a parked call:
- Do one of the following:
- Dial the appropriate feature access code.
- Press the Call Park - Retrieve feature key (must be programmed).
- Dial the directory number on which the call is parked (not required if the number is programmed to the Call Park feature key).
- If there are multiple calls parked on the number, dial the two-digit index number to retrieve a specific call, or # to retrieve the longest parked call.
Call Pickup
To answer a call that is ringing at another extension in your Pickup Group:
- Lift the handset.
- Press the key that you programmed as Pickup.
To answer a call that is ringing at another extension not in your Pickup Group:
- Lift the handset.
- Dial the appropriate feature access code.
- Dial the number of the ringing station.
Campon
When you get a busy tone, you can use the Campon feature to be notified when the busy party becomes available.
To Campon to a busy station:
- Press the I Will Wait softkey.
To retrieve a call when you hear the Campon tone:
- You can use the Trade Call or Call Swap feature with the
 (TRANS/CONF) hardkey or a programmable line key.
Direct Paging
Direct Paging allows you to page a party through their handsfree speaker. If the paged party has Off-Hook Voice Announce enabled, the page will be heard even when the party is on a handset or headset call. If the paged party has Handsfree Answerback enabled and turned on on the phone, your page automatically establishes a handsfree call with the paged party.
To page a party:
- Lift the handset.
- Press the Direct Paging feature key or dial the appropriate feature access code.
- Dial the directory number.
- Speak to the dialed party after the tone.
How you answer a Direct Page depends on whether Handsfree Answerback is enabled and turned on at your phone. See one of the following procedures in this guide:
Direct Paging - Handsfree Answerback Enabled
When you receive a Direct Page, Handsfree Answerback automatically establishes a Handsfree call on your phone after a single burst of tone.
Your administrator enables or disables Handsfree Answerback on your phone. After your administrator enables Handsfree Answerback, you can choose to turn it on or off directly from your phone.
To turn Handsfree Answerback on:
- When your phone is idle, press
 (MUTE) once. The MUTE key light flashes to indicate that Handsfree Answerback is ON.
 - When a Direct Page arrives, the MUTE key light turns OFF and a Handsfree call is automatically established.
To turn Handsfree Answerback off:
- Press the flashing
 (MUTE) key once. The MUTE key light turns OFF.
 - To respond to a Direct Page when Handsfree Answerback is OFF, see Direct Paging - Handsfree Answerback Disabled.
| Note: By default, Handsfree Answerback is turned OFF at your phone. If the |


To answer a call using Handsfree Answerback:
Phone state before Page arrives | To answer the Direct Page |
Phone is idle and MUTE is flashing |
|
You are on a handset or headset call, and MUTE is OFF |
|
You are on a MUTED handset/headset call, OR, you are on a Handsfree call | The party paging you receives a busy tone. Handsfree Answerback does not interrupt your call. |
To end a Handsfree Answerback call:
- Press either
 (SPEAKER) or
  (CANCEL).
When the Handsfree Direct Page call ends, the MUTE key light returns to the state it was in before the call was established.
Direct Paging - Handsfree Answerback Disabled
Your administrator enables or disables Handsfree Answerback and you can also turn it on or off on your phone. To turn Handsfree Answerback off, see Direct Paging - Handsfree Answerback Enabled. When Handsfree Answerback is disabled on your phone and you receive a Direct Page, the Direct Page is indicated by a single burst of tone.
To answer Direct Page calls when Handsfree Answerback is disabled:
Phone state before Page arrives: | To answer the Direct Page (indicated by single burst of tone): |
Phone is idle and MUTE is OFF. |
|
You are on a handset call or headset call, and MUTE is OFF |
|
You are on a MUTED handset/headset call, OR, you are on a Handsfree call | The party paging you receives a busy tone. Handsfree Answerback does not interrupt your call. |
To end a Direct Page call, do one of the following:
- Hang up the handset to end a handset call.
- Press
 (SPEAKER) to end a Handsfree call.
 - Press
 (CANCEL).
When the Handsfree Direct Page call ends, the (MUTE) key light returns to the state it was in before the call was established.
Direct Voice Call
Direct Voice Call feature allows you to establish a two-way handsfree call at another extension whether or not it has Handsfree Answerback or Auto-Answer turned on. Only extensions programmed by the system administrator to receive Direct Voice Calls can be called using this feature.
To make a Direct Voice Call:
- Lift handset.
- Dial the appropriate feature access code.
- Dial the extension you want.
- Speak to called party.
Do Not Disturb
When you enable Do Not Disturb, callers will get a busy tone, and an on-screen text message indicating that you do not wish to be disturbed.
To activate or deactivate Do Not Disturb:
- Press the Do Not Disturb key that you programmed. The key indicator is lit when Do Not Disturb is activated and is not lit when Do Not Disturb is not activated. The phone status line shows the Do Not Disturb
 icon.
icon.
To activate Do Not Disturb from a remote extension:
- Lift handset.
- Dial the number of the station to which Do Not Disturb is to apply.
- Hang up.
To deactivate Do Not Disturb from a remote station:
- Lift handset.
- Dial the appropriate feature access code.
- Dial the number of the station with Do Not Disturb activated.
- Hang up.
Emergency Calls
Warning for emergency number dialing: Consult your local authorities for Emergency Numbers and 911 or equivalent service availability in your area.
There are two methods of dialing emergency numbers, based on the MCD programming:
- Emergency Call Routing NOT programmed
- Emergency Call Routing programmed
| CAUTION: Verify with your System Administrator which type of emergency number dialing you can use. |
Emergency Calls When Emergency Call Routing Not Programmed
If Emergency Call Routing is NOT programmed, Emergency Number dialing should only be performed by picking up the handset and selecting the Analog Line key you have programmed. If Privacy Mode is enabled and the Analog Line key local line is busy, dialing will not occur on the Line Interface Module line. Emergency dialing using an IP connection may not be supported due to ICP system configuration and country location. For more information, contact your System Administrator.
To make an Emergency Call using the Line Interface Module line:
- Lift the handset.
- Press the Analog Line key that you have programmed. The set indicates ANALOG CALL
- Dial your Local Emergency Number.
To make an Emergency Call using the Line Interface Module line, when the IP connection has failed:
- Lift the handset.
- Press the Analog Line key that you have programmed. The set indicates IP FAIL: ANALOG CALL.
- Dial your Local Emergency Number.
Emergency Calls When Emergency Call Routing Programmed
| Note: This procedure is in addition to the methods described above. |

To make an Emergency Call if Emergency Call Routing is programmed:
- Lift the handset.
- Dial your Local Emergency Number (911 or equivalent).
For more information on using the LIM line, refer to Using The Line Interface Module.
Float Keys
Float keys are used to display unanswered ringing lines on designated keys where the ringing lines would otherwise be hidden on one of the phone's programmable keys. The location of the Float keys is shown in the following figure:
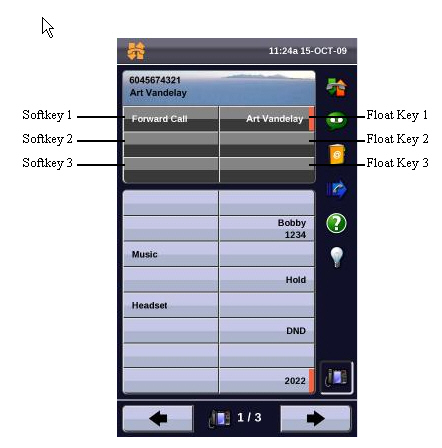
Up to three concurrent incoming calls with associated labels can appear on Float keys. Float keys can also be used to support ringing line queues – due to the number of ringing lines at any one time, you are able to view the queue of unanswered "floated" lines, and answer them as quickly as possible.
Only the following line types are supported for float keys on 5360:
- Single Line
- Key System
- Multicall
Programming Float Keys
You program the keys to appear on Float Keys using the Settings application on the 5360 phone. Float Keys act essentially as a mirror of any of the lines programmed on the 48 programmable keys and which are programmed to float. The Float Keys reflect the state of those lines including indicators and labels, and allows you to access those lines without having to navigate to the pages where those keys may be displayed. Any answered floating line remains floating for the duration of the call, regardless of the manner in which it was answered.
To enable float keys:
- Press the blue Menu key
 .
. - Press Settings.
- Press Float Keys.
- Press Enable, and then press Save.
To program Float Keys using the Settings Application:
- Press the blue Menu key
 .
. - Press Settings.
- Press Programmable Keys.
- Press one of the line keys that you want to appear on a Float Key. Use the Page Navigator keys to move through the pages of programmed keys if necessary. The Float Configuration display appears.
- Press a button corresponding to your desired float configuration: Float Immediate – configure the unanswered incoming call on the designated line to appear at the Float Key immediately Float after. . . – configure unanswered incoming calls to display on a Float Keyafter a delay of up to 60 seconds Do Not Float – configure unanswered incoming calls to never display on a Float Key (this is the default setting)
- Press Save.
- Repeat steps 4 – 6 for every line key that you want to appear on the float keys.
- Press Close.
To disable float keys
- Press the blue Menu key
 .
. - Press Settings.
- Press Float Keys.
- Press checkbox for Enable to disable Float Keys.
- Press Save.
Using Float Keys
You can set up more than three lines to float. As lines ring, they get placed into a queue which will display the first three in the float key area. If there are more than three lines configured to float, as Float Key positions are freed up, the next lines in the queue get displayed. Press the Float key of the ringing line to answer a call.
Group Listen
With Group Listen, you can carry on a conversation using the handset or headset while allowing others nearby to listen to the person at the far end over the handsfree speaker. The handsfree microphone is disabled in Group Listen mode.
To activate Group Listen while in a handset conversation:
- Press the Group Listen key. Audio from the far-end party is now heard through both the handset/headset and the speaker.
To make the call a normal two-way speaker call:
- Press
 (SPEAKER).
To exit Group Listen mode (and return to a normal handset/headset call):
- Press the Group Listen key.
To activate or deactivate Group Listen while in headset mode:
- Press the Group Listen key.
Group Paging / Meet Me Answer
Group Paging allows you to page a group of phones through their built-in speakers. You can belong to as many as three paging groups with one group designated as your "prime" group.
When you need to respond to a Group Page but don't know the identity or directory number of the paging party, use the Meet Me Answer feature. You have up to 15 minutes after receiving the page to use Meet Me Answer.
To make a Group Page:
- Lift the handset.
- Press Direct Page or dial the appropriate feature access code.
- Do one of the following:
- To page your prime page group, press #.
- To page a specific page group, dial the page group directory number.
- Speak to the dialed party after the tone.
To respond to a Group Page by using Meet Me Answer:
- Lift handset.
- Press the key you have programmed to Meet Me Answer or dial the appropriate feature access code. (See Programing Features On Your Keys for instructions on programming features to your phone.)
- Do one of the following:
- To respond to a page from your prime page group, press #.
- To respond to a page from a specific page group, dial the page group directory number.
Group Presence
Group Presence allows members of call groups (Hunt, ACD, Ring, and Personal Ring) to make themselves absent or present in a group. Only members who are present in a group are offered calls to that group.
If you are in a Personal Ring group (see Handoff - Personal Ring Groups), Group Presence lets you choose which device in the group you want to use to receive calls by making it 'Present' and the others 'Absent.'
You can also change the presence status of other users if allowed by your system administrator.
Users belonging to multiple groups can control their presence in each group separately through the use of feature keys (one for each group), or by dialing a feature access code (FAC) followed by the group number. For information about programming feature keys, see page .
To join a group:
- Lift the handset.
- Do one of the following:
- Press the Group Presence feature key to join the group associated with the key.
- Dial the Group Presence - Join Group feature access code followed by the group directory number.
The LED associated with the key is steady lit when the member is present and off when absent.
To leave a group:
- Lift the handset.
- Do one of the following:
- Press the Group Presence feature key to join the group associated with the key.
- Dial the Group Presence - Leave Group feature access code followed by the group directory number.
The LED associated with the key is steady lit when the member is present and off when absent.
To change another group member's presence status:
- Lift the handset.
- Dial the Group Presence - Join Group Third Party or Group Presence - Leave Group Third Party .
- Dial the directory number of the group member.
- Dial the group directory number.
To change the presence status of another Personal Ring Group member using a feature key:
- Press the Personal Ring Group Presence feature key.
The LED associated with the key is steady lit when the member is present and off when absent.
Handoff - Personal Ring Groups
Personal Ring Groups (PRGs) associate two or more of your devices, such as your office phone and cell phone, with a single user Directory Number (DN). PRGs are set up by the system administrator. Group member devices ring simultaneously when called.
You can use the group Handoff feature to "Push" or "Pull" calls between group member devices. A Push passes the call to the group, where it can be answered by any other present group device. A Pull takes an in-progress call away from another member.
To use Handoff to Push an in-progress call to the PRG:
- Press the Handoff key.
To Pull an in-progress call from another member of the PRG:
- Lift the handset (optional if the device supports handsfree operation).
- Press the Handoff key.
Headset Operation
| Note: For information about the Cordless Headset, see USING YOUR PHONE WITH THE CORDLESS MODULE AND ACCESSORIES on page . |

To enable Headset Operation:
- Press the Headset feature key.
To answer a call (when Auto Answer is disabled):
- Press the flashing line key or Float Key.
To answer call (when Call Notification is enabled)
- Select Close and then select the prime line.
To hang up:
- Press
 (CANCEL).
To mute your headset microphone:
- Press the
 (MUTE) key. The light turns ON.
To turn mute off and return to the conversation:
- Press the
 (MUTE) key. The light turns OFF.
Hot Desking
Hot Desking allows you to log into the phone system from any phone designated as a Hot Desk phone. When you log in at the phone using your assigned Hot Desk User Directory number, the phone assumes all your speed dials, features keys, call forwarding setup, and line appearances - even your language preference for the display. Any changes you make to the phone while you are logged in-for example, adding a speed dial-are saved to your personal profile. Logging in activates your profile on any phone that supports Hot Desking.
When you log in as a hot desk user, Call History data is updated for you. You do not see any call logs for the phones registered DN; you only see your history data. When you log out, the registered DNs history data is displayed. To access your voice mail when you are logged in as a hot desk user, you must log in to your voice mail.
To log into a Hot Desking phone (the phone must be idle):
- Press the key you have programmed to HotDesking.
- Press the Login key.
- Using the phone keys, enter your Hot Desk User Directory number, and then press OK.
- Enter your pin number and press OK.While logged in as a hot desk user, the phone status line shows the Hot Desk
 icon.
icon.
To log out of Hot Desking phone (the phone must be idle):
- Press the key you have programmed to HotDesking.
- Press the Logout command key.
- Press the Confirm command key.
| Note: Your profile can only be active on one phone at a time. If you log in from another phone without logging out from the first one, the system will automatically deactivate your profile on the first phone. |

Hot Desk Remote Logout
A user who has forgotten to log out of a Hot Desking phone can be logged out from a phone that is configured to allow Hot Desk Remote Logout.
| Note: This feature must be allowed by your System Administrator via the Class of Service. |

To remotely log out a Hot Desking phone:
- Dial 111.
- Dial the Hot Desk User Directory number that you want to log out.
- Press the Logout command key.
- Press the Confirm command key.
Hot Desk - PIN Change
To change your Hot Desk PIN:
- Log into a Hot Desking phone.
- Press Superkey (must be programmed to a key).
- Press the HotDesk PIN softkey.
- Press the Yes softkey.
- Enter the current PIN or skip to step 6 if a PIN has not yet been assigned.
- Press the Enter softkey.
- Enter the new PIN.The PIN can include digits from 0 to 9 only and can be from 0 to 8 characters in length.
- Press the Enter softkey.
- Re-enter the new PIN.
- Press Superkey.
Make Busy
You can use the Make Busy feature to have your phone appear busy to other callers. If callers dial your phone number when Make Busy is enabled a message indicating that your line is busy is displayed on their phones.
To enable Make Busy:
- Press the key you programmed to Make Busy. The key illuminates when Make Busy is activated and MAKE BUSY is displayed.
To disable Make Busy:
- Press the key you programmed to Make Busy.
Message Waiting Indicator
The Message Waiting Indicator (MWI) feature allows you to be notified when messages have been left on another phone. Once you have programmed a key to MWI, this key is always enabled.
To use MWI to contact the extension that left a message:
- Press the key you have programmed to MWI.
Messaging - Advisory
Advisory Messaging enables you to select a notice that appears on your phone display to inform people visiting your desk of your whereabouts. Select from a variety of advisory messages, including "On vacation", "In a meeting", or "Out to Lunch".
To turn Messaging - Advisory on:
- Press Superkey (must be programmed to a key).
- If necessary, press the No softkey until "Advisory Msgs" appears.
- Press the Advisory softkey.
- Press the Next softkey until the desired message appears.
- Press the Turn Msg On softkey.
To turn Messaging - Advisory off:
- Press Superkey (must be programmed to a key).
- If necessary, press the No softkey until "Advisory Msgs" appears. .
- Press the Yes softkey when "Advisory appears.
- Press the Turn Msg Off softkey .
Messaging - Callback
To leave a Callback Message when you hear busy or ringback tone:
- Press
 (MESSAGE) or press the Callback softkey.
To respond to a message waiting condition on your phone:
- Press
 (MESSAGE).
 - If a password is required, dial your password (and press the Enter softkey if available).
- Press the Read Message softkey, and do one or all of the following:
- To display the time the message was sent, press the More Msg softkey.
- To display the number of the caller, press the More Msg softkey twice.
- To call the message sender, press the Call softkey.
- To delete the message, press the Erase Msg softkey.
- To view the next message, press
 (MESSAGE).
You can check for messages from a remote station:
- Press Superkey (must be programmed to a key).
- Press the No softkey until "Remote Msging?" appears.
- Press the Yes softkey.
- Dial your directory number.
- Press the Enter softkey.
- If a password is required, enter your password and press the Enter softkey.
- Press the Yes softkey.
You can set, change, or clear a password (up to 7 digits, not including 0):
- Press Superkey (must be programmed to a key).
- Press the No softkey until "Set Password?" appears.
- Press the Yes softkey.
- Do one of the following:
- To enter a new password, enter your password.
- To change or clear your password, enter your current password.
- Press the Enter softkey.
- To change or clear your password, do one of the following:
- To change your password, enter your new password and press the Enter softkey.
- To clear your password, enter 0.
- Enter your new password again.
- If you are setting up or changing a password, press the Enter softkey.
- Press Superkey (must be programmed to a key).
Messaging - Cancel Callback
To cancel a Callback:
- Lift the handset.
- Dial the appropriate feature access code.
- Dial the number of the called station.
- Hang up.
Messaging - Cancel All Callbacks
To cancel all Callbacks:
- Lift the handset.
- Dial the appropriate feature access code.
- Hang up.
Music
To turn Music on and off when the phone is idle, do one of the following:
- To turn the music on, press the key that you programmed to Music or the Music softkey.
- To turn the music off, press the key that you programmed to Music or the Music softkey.
When the Music is activated, the key you have programmed is highlighted.
Night Answer
The Night Answer feature allows you to route calls to an attendant or message at night.
To enable Night Answer:
- Press the key you programmed to Night Answer. When you have enabled Night Answer, this key is highlighted.
To disable Night Answer:
- Press the key you programmed to Night Answer.
Override (Intrude)
When you dial a number whose owner has enabled Make Busy, your phone displays the message indicating that the line is busy. You have the option to override this setting.
To use Override when you encounter a busy tone:
- Press the key you programmed as Override.
- Wait for an answer.
Paging
To use Paging:
- Lift handset.
- Press the key that you have programmed to Page.
- Dial the Paging zone number (if required).
- Make the announcement.
Phone Lock
Phone Lock prevents access to the features on a phone, with the following exceptions:
- unlocking the set via a user PIN
- Hot Desk Login and Logout support, and
- Emergency Call Notification support.
Phone Lock has no effect on incoming calls but restricts outgoing calls, with the following exceptions:
- calls to emergency trunk routes, and
- local operators.
Most keys on the device are disabled, except for the dial pad and volume keys. The following access and keys are disabled:
- Superkey access
- Applications access
- Softkeys
- feature access keys
- feature access codes, and
- account codes
| Note: Softkeys will be displayed but disabled, except the hot desking softkeys will remain enabled. The Phone Lock, Hot Desk login, and Emergency Notification feature access keys will still be available. Superkey will provide Emergency Notification, if it is pending. |

Before locking a set, ensure that:
- the set is in the idle state (there should not be any ongoing call)
- you do not have any calls on hold or on consultation-hold on any line appearance
- you are not in headset mode
To activate Phone Lock:
- Press the Phone Lock feature key or enter the Phone Lock Feature Access code.
To de-activate Phone Lock:
- Press the Phone Lock feature key or enter the Phone Unlock Feature Access code.
- Enter your user PIN to unlock the set.
| Note: If a user PIN has not been assigned, enter # when prompted for the PIN to unlock the phone. |

User PIN
A Personal Identification Number (PIN) allows a user to log into a set as a hot desk user or generic SIP user. It is also used to de-activate the Phone Lock feature. PINs must be from 0 to 8 digits in length. Only digits (0 to 9) are permitted. The default PIN is blank (length zero).
Users will have one generic PIN that can be used for any required features.
The User PIN initially has a zero length, allowing a user, for example, to unlock a phone using a blank PIN for Phone Lock. Setting the User PIN on the set requires the PIN to have at least one digit.
To change the User PIN:
- Press SuperKey (must be programmed to a key)
- Press No until "Set User PIN?" appears.
- Press Yes softkey or the User PIN softkey.
- At the prompt "Enter Old PIN", enter your old User PIN.
- Press Enter.
- At the prompt "Enter new PIN", enter your new PIN. Use left arrow key to correct mistakes. The PIN can include digits from 0 to 9 only and can be from 0 to 8 characters in length.
- Press Enter.
- At the prompt to verify the PIN, re-enter your new PIN again. The set confirms successful or failed completion.
- Press Superkey to end the Superkey session.
Record a Call
This feature uses your voice mail system to record your phone conversations.
| Note: You may be required by law to inform the other party that you are recording the conversation. For specific instructions, consult your system administrator. |

To start recording while on a 2-party call:
- Press the Record Call key. (See Programing Features On Your Keys for instructions on programming a Record Call key to your phone.)
| Note: Your system may be programmed to automatically begin recording external calls when you or the other answers. |

To control recording, do one or all of the following:
- To pause recording, press the Pause softkey.
- To resume recording after pausing, press the Resume softkey.
- To stop a recording without saving it, press the Erase softkey or
 (CANCEL).
 - To stop and save a recording, press the Save softkey.
Putting the call on hold saves the recording; taking the call off hold starts a new recording. Depending on system programming, hanging up, or pressing  (TRANS/CONF) or a DSS key, may also save the recording.
To listen to a recording:
- Lift the handset.
- Access your voice mailbox.
- Follow the prompts to retrieve the recording.
Reminder
To program a Reminder:
- Press Superkey (must be programmed to a key).
- Press the No softkey until "Timed Reminder" appears.
- Press the Reminder softkey.
- Enter the time in 24-hour format.
- Press the Save softkey.
To view, change, and/or cancel a pending Reminder:
- Press Superkey (must be programmed to a key).
- Press the No softkey until "Timed Reminder" appears.
- Press the Reminder softkey.
- Do one of the following:
- To change the Reminder, press the Change Key softkey, enter the new time, and press the Save softkey.
- To cancel the Reminder, press the Cancel No. softkey.
- To exit without canceling the Reminder, press Superkey (must be programmed to a key).
To acknowledge a Reminder when your phone rings once:
- Press the Confirm softkey.
Voice Dialler
Users of the Voice Dialler softkey can place a call by speaking the name of the person they wish to dial. Voice Dialler enables you to have access to Mitel Speech Server. The Speech Server is a speech recognition application that routes incoming calls to a specific destination based on spoken commands.
To dial a call using Voice Dialler:
- Press the key you have programmed to Voice Dialler.
- Speak the name of the person you wish to call.
Speed Call
Speed Call is an application that allows you to dial a specific number with one key press. You must program Speed Call on a Programmable key. For more information on programming this key, see Program Feature Keys Using the Settings Application.
To make a Speed Call:
- Press the key that you have programmed as your Speed Call key.
Contact Presence
Unified Communicator (UC) Express supports the display of contact presence information through icons located on Programmable Keys that have been programmed as speed dials. The icons will be displayed on the button. The presence icons for the 5360 are shown below:
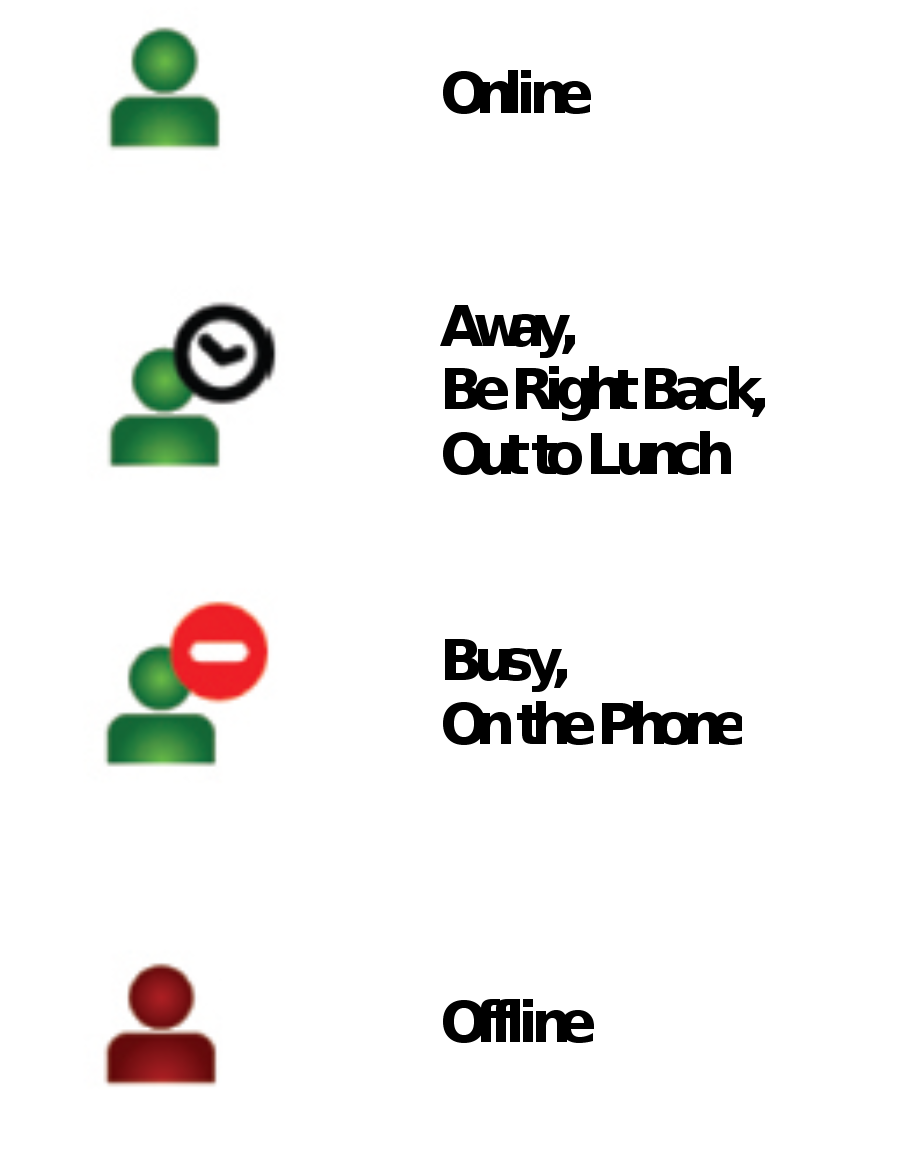
Contact Presence Icons
An alternate speed dial number is supported for each contact, and the button label will show the alternate number instead of the primary number for some presence states.
For the 5360, when a user presses a programmable key which is in the alternate speed dial number state:
- The programmable key text will change to display the primary number for two seconds giving you the option to dial the primary number
- If you press the button again while the primary number is displayed, the primary number will be dialed; otherwise, the alternate number will be automatically dialed after the two second timeout.
Tag Call
Tag Call allows you to signal that you are the victim of a threatening or malicious call. Using the tag, your system administrator or Telephone Company can identify the source of the call and provide this information to appropriate personnel or authorities.
| CAUTION: Tagging a non-malicious call may result in fines or other penalties. |
To tag a malicious call:
- Press the programmed Tag Call key while the call is in progress. (For information on how to program keys, see Programing Features On Your Keys.) OR Press
 (TRANS/CONF).
 - Dial the appropriate feature access code. If the call was successfully tagged, Thank You is shown on the display; otherwise, Not Allowed is displayed.
| Note: Tag Call can be used on active two-party calls only. Calls on hold and conference calls cannot be tagged. |

Trunk Flash
The Trunk Flash feature allows you to access Centrex features (if available) while you are talking on an outside call.
To flash a trunk while talking on an outside call:
- Press the key you have programmed to Flash. Note: You can program a key to single flash or double flash.
- Wait for dial tone.
- Dial the Centrex feature access code.