Leader and Participant Console
Leader and Participant Console (during a Web Conference)
Your view will vary depending on how you decided to join.
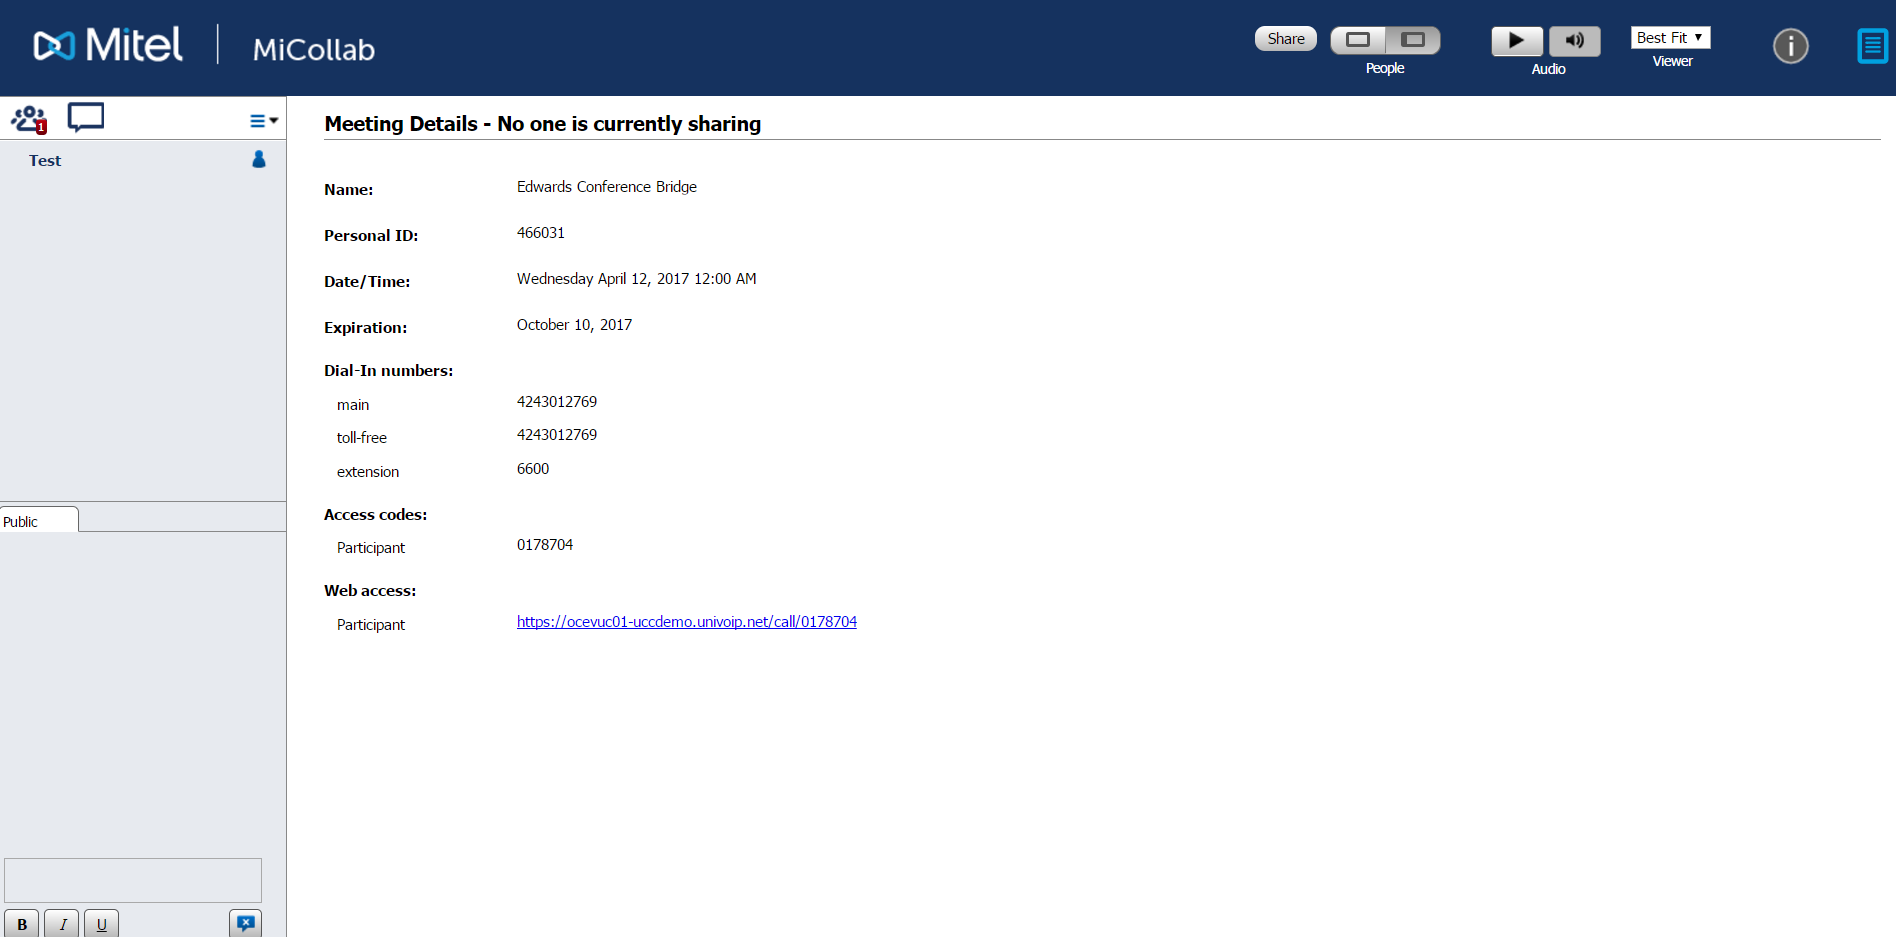
If you have joined using the “via Web” option, your screen will look like the image below: A participant list and chat area are in the left panel…the main window becomes the viewer once screen sharing has started. If you are the presenter, click the Share button to start sharing your screen.
If you joined using the “via Windows Client” option…you will notice the pop up window seen below.
The participant list is in the left panel…in the main window, you can use the options on the “Meeting Center” tab to do things like Share your screen, start broadcasting your video camera, use computer audio instead of calling in, share documents, or exit the meeting. The Chat tab can be used to chat with participants. Once screen sharing has started, a “Viewing” tab will appear in the main window.
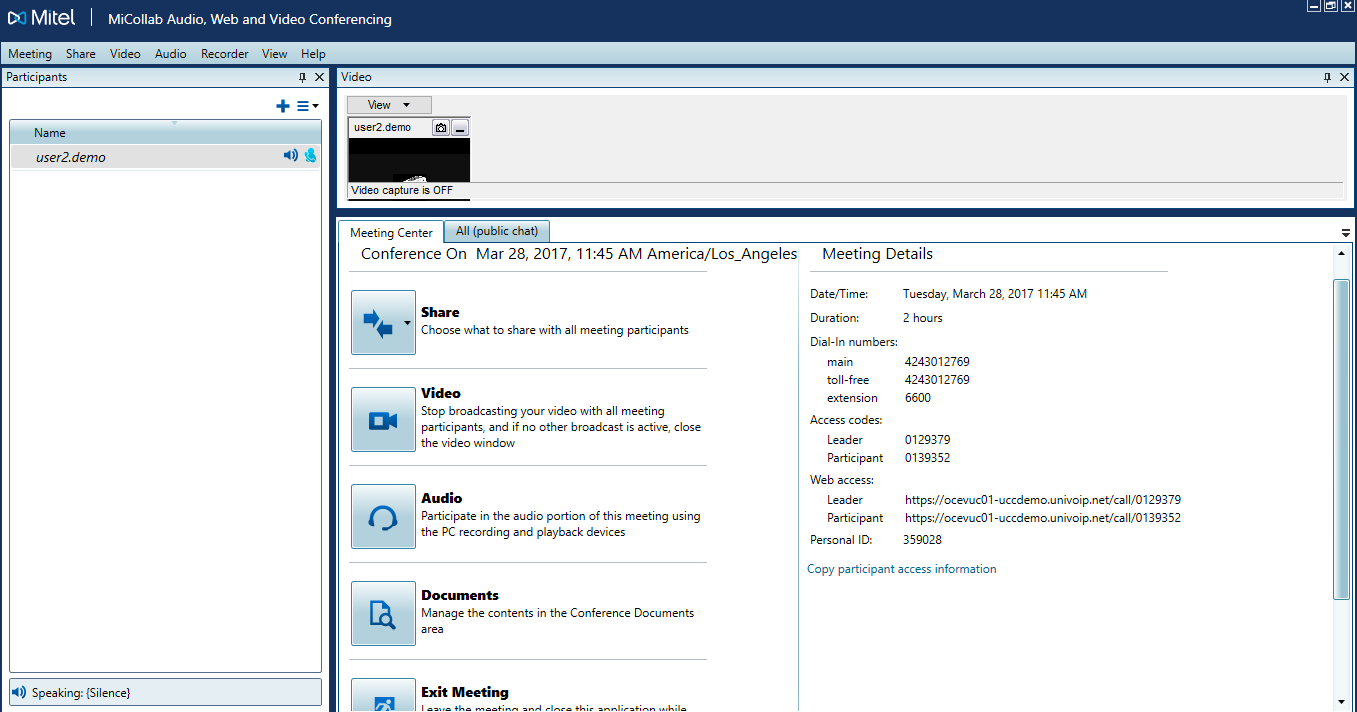
The Meeting Center interface provides a summary of information regarding the meeting as well as the following important meeting functions:
 Share : You can click on the Share button to choose the content you would like to share with all meeting participants.
You can choose from your desktop, a region of your desktop, or a single application. After you have made your selection and confirmed that you would like to start sharing, all meeting participants are able to see what you have selected to share.
This tool enables you to preview, pause, or stop sharing, as well as access the whiteboard tools and other settings.
 Video : You can click on the Video button to immediately broadcast your video to all meeting participants.
Your video, along with the video of any other participants who are broadcasting video, automatically appears in the Video window. By default, this window is located at the top of the client, but can be moved using the Dock Windows feature.
From the Video window, you can preview, pause, or stop broadcasting, as well as take snapshots and modify video capture options. You can also return to the Meeting Center to stop broadcasting your video
 Audio : You can click on the Audio button to start using a headset connected to your PC (2-way audio) during the conference (instead of using your desk phone).
When you click Audio, you get connected to the conference and you will hear a prompt indicating that you have joined the conference.
Your speaker and microphone controls will appear in the toolbar to allow you to control the volume of the speaker and mute/unmute the microphone while in the conference.
This button is a toggle button between Start and Stop Audio which allows you to join or exit the audio portion of the conference.
To Select Audio Source, Select Audio under Preferences. This option is disabled if you are already active in Audio through Client.
NOTE: This button is only visible when connected to a server running 5.0 or later software and if the conference is a an Audio or Audio/Web conference. The use of a headset connected to your PC is necessary to avoid audio feedback.
 Documents (Leader only) : You can click on the Manage Documents button to share documents with all the meeting participants. You can browse documents on your computer and post them on the MiCollab Audio, Web and Video Conferencing server.
 Documents (Participants only): You can click on the View Documents button to view any documents that the leader has posted on the MiCollab Audio, Web and Video Conferencing server for all meeting participants to access during the meeting.
 Exit Meeting : This button allows you to leave the meeting and exit the client. Any associated audio will be disconnected.
 End Meeting : This button is only visible to you as a leader. It enables you to end the meeting by forcing out all the participants (including audio only participants) from the meeting including the leader and exits the client for the leader. Participants will receive a pop-up message indicating “The leader has ended the conference”.

The Leader Console menu includes these topics across the top:
Meeting Menu: You can Invite Participants, View Participant Approval, access Preferences, Polling, Lock Meeting, Clear Chat History, File Transfer, Document Manager, End or Exit Meeting.
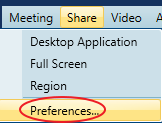
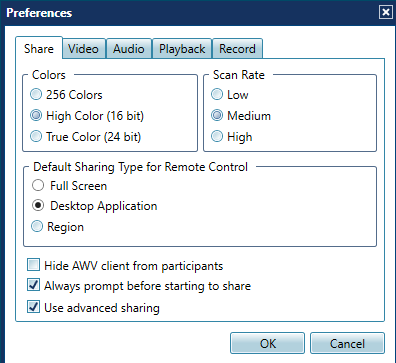
Share Menu: You can share the Application, Desktop, or Region during a conference.
Video Menu: You can Start or Stop broadcasting Video.
Audio Menu: You can Start or Stop Audio through PC.
Recorder Menu: You can Start, Stop, Open, Play or Export Recording.
View Menu: You can control the various views or windows involved in the conference. These windows include:
Participants
Chat
Video
Recorder
Dock Windows
Restore Last Layout
Restore Default Layout
Help Menu: You can access to the MiCollab Audio, Web and Video Conferencing User Help (this file), display the version of MiCollab Audio, Web and Video Conferencing Client you are running and save logs into a zip file.
Meeting Menu
- Invite Participants: Enables you to invite participants to a web conference that is in progress.
- View Participant Approval: Displays the participant approvals list. From here, you can authorize participants waiting to join the meeting.
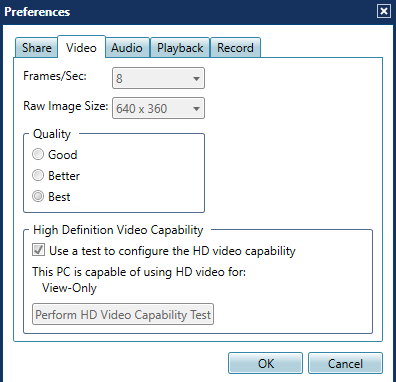
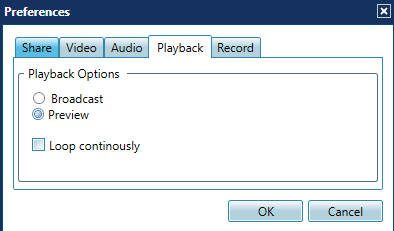
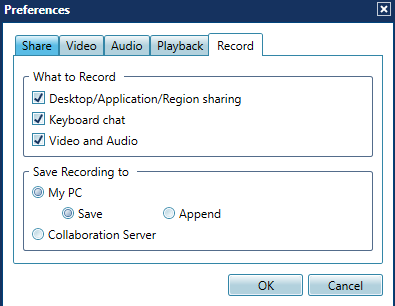
- Preferences: Allows direct access to the Share, Video, Audio, Playback or Recorder preferences.
- Polling: Enables you to survey participants and record their responses.
- Lock Meeting: Enables you to lock an audio and web conference (including video) that is in progress.
- Clear Chat History: Clears the chat history displayed when participants chat during the web conference.
- File Transfer: Enables you to transfer files to participants in the conference.
- Document Manager: Enables you to transfer files to the MiCollab Audio, Web and Video Conferencing server and share them with participants.
- Exit Meeting: Enables you to leave the web conference in which you are participating.
- End Meeting: Enables you to end the meeting by forcing out all the participants from the meeting including the leader.
Share Menu
Share a desktop application, a region of your screen or your full screen.
Sharing preferences are also found here...see the images below:

Video Menu
The Video option in the View menu enables you to include video that you can broadcast to participants in your Web conference. You must have a camera installed and connected to your computer to use this feature. Use Preferences to configure your video settings. Please note: Terminal server environments, such as Citrix® and Remote Desktop, do not support video conferencing.
Click Start Video to play a video. Click Stop Video to stop the video.
In the Video window are the View menu and video buttons. The View menu allows you to control which video screens are shown in the Video window and includes the following:
Local Video: Allows you to show or hide your view within the Video window.
Attendees: Allows you to show or hide the video screen of the participant within the Video window.
Auto-Minimize Local Video: Allows you to make your view appear as a smaller screen within the Video window and the view can be positioned anywhere within the Video window. Auto-minimize is set at the start of each video session.
The video buttons are shown in your view and allow you to control the video broadcast. The buttons provide these functions:
When you are ready to broadcast, click ![]() and the image from your camera is broadcast to the attendees.
and the image from your camera is broadcast to the attendees.
The button changes to ![]() so you can pause your video broadcast.
so you can pause your video broadcast.
Click ![]() to end the video broadcast but keep the Video tab open.
to end the video broadcast but keep the Video tab open.
When you start a video, the Video window is black until you click ![]() and initialize your camera. If your camera is properly installed, the video broadcast will start. Preview allows you to make adjustments to the camera before you broadcast to attendees.
and initialize your camera. If your camera is properly installed, the video broadcast will start. Preview allows you to make adjustments to the camera before you broadcast to attendees.
Camera: Set the input for your video. Camera will broadcast your view in the Video window.
AVI Player: Set the input for your video. AVI Player allows you to browse to a file on your computer and broadcast it in the Video window.
NOTE: When you select an .avi file to play, only the video portion is broadcast.
Settings: Allows you to select and adjust the video quality and video related options. Also see instructions To change Video Camera.
File: When AVI Player is set, you can browse to and select an .avi file to broadcast.
Repeat or Single Play: When AVI Player is set, you can play the video continuously or play it only one time.

Allows you to capture the video screen content and save it as a bitmap file to a location that you specify.
Allows you to hide the video screen of the selected attendee from your Video window only. To show the video screen of an attendee that was hidden, select their name from the list under the View menu.
To Change Your Camera
Start broadcasting your video
In Video View, click on Video Capture Options icon

Select Settings option
Select Video Source
Select a Video Device from the drop-down list
Click OK.
Audio Menu
The Audio menu (also known as Audio through PC) allows you Start and Stop Audio through your PC as well as setting Preferences.
Please Note: The use of a headset connected to your PC is necessary to avoid audio feedback.
Recorder Menu
This feature allows you to start, stop, open, play and export recordings and access the Playback and Record preferences options.
Open Recording: This option allows you to play a recording saved on your computer while you are in the Web conference. Browse to the file location, and then click
 .
.- Export Recording: This option allows you to export an .lrec (proprietary format) recording and save it to standard .avi format. The Export to AVI utility opens when you select a file from your computer.
Please note: Exporting of a recording with audio may take 2 to 3 times the actual duration of the recording. You can still join a conference while the exporting function is taking place.
Select Recorder from the View menu, the Recorder is displayed in the toolbar below the menu with the following options:
Play/Pause
 /
/ 
Stop

Record button

The slider (show progress of a recording)
Microphone Mute/Unmute
 /
/ 
Speaker control Mute/Unmute
 /
/  are displayed in the tool bar.
The name of the recording being played is displayed above the slider.
To hide the recorder, select the recorder again from the View menu (unchecking it).
To view or hide the recorder
Click
 on the Recorder. The recording begins and the Recording Description dialog box appears.
Type a description for the recording, and then click OK.
Click
 to stop and save the recording.
Please note: You can record a Web conference, and then save it to your computer or to the MiCollab Audio, Web and Video Conferencing server. You can append a saved recording, but the recording must be on your computer.
To record a Web conference:
Click
on the Recorder. The recording begins and the Recording Description dialog box appears.Type a description for the recording, and then click OK.
Click
to stop and save the recording.
When you are recording:
If you use public and private chat while recording, only public chats are recorded and shown when played back.
If you change preferences while recording, the changes do not take affect until after the recording is finished.
In playback mode, the leader has full use of these Recorder functions:
Scroll Bar: When you play a recording, you can use the scroll bar to move backwards and forwards through the recording.
Index: The index counter is used as a reference point in a recording or playback.
Timer: Recorder has two timers; one to track elapsed time, and one to show the actual length or total time of the recording. Only the first timer is active when recording.
Recorded sessions can be made available for participants to play back whenever they want to view the recorded session. Web recordings for public conferences are available in the Published Area page. Web conference recordings that you saved on the MiCollab Audio, Web and Video Conferencing server are listed on the Recordings tab.
Please note: The Recorder menu is hidden when using Advanced sharing. While sharing, you will need to use the recorder button  on the share control.
View Menu - Participants
You can open the Participants view by clicking the Participants option under the View menu on the Leader or Participant console (all options listed below are only available to the leader with the exception of Associate Participant and Private Chat). The Participants view shows a list of all participants in the conference. Icons next to the name in the participant list indicate the controls currently available to that attendee. The leader manages participants in the conference with the use of these icons.
Toolbar Buttons (such as appears above the list of Participants). The options will be different depending on your status as a leader or a normal participant.
Leader's view
You will have access to the following options:
- Invite more : this button allows a leader to invite more participants.
Options menu : this button presents a drop-down menu with the following options:
Mute all participants
Hold all participants
Restore audio for all participants
Acknowledge all hand gestures: disabled if no hand gestures to acknowledge
Show details for all participants: checkable preference that shows/hides the detailed information about participants feature access and audio status (default unchecked)
Line 1: shows either Leader or the Personal ID of the participant using the client.
Line 2: lists the audio status of the participant.
None means participant has no audio connection
Active, Muted or On Hold will be displayed for participants with audio. The caller ID phone number of the audio source will be provided if available.
For Audio through PC, the caller ID will display PC (for Personal Computer).
For other associated audio, a button to “Unassociate” the audio from the client is provided.
Line 3: identifies the ability to collaborate. If the participant is using one of the clients to view the conference, Collaboration: Available is displayed, otherwise Not Available is shown.
Show options for all participants: checkable preference that shows/hides the action/status buttons at all times instead of only on mouse hover (default checked)
These icons are a visual representation of the status of the participant:
Leader: The leader is shown with a different color icon: Also, the tool tip displayed when hovering over the leader’s name in the list will show the name of the leader appended with Leader.
Client: For a participant that is using one of the clients to view the conference, the client icon is displayed:
Audio: For a participant that has both a client and audio, the client icon is showed with a phone overlayed:
Audio-Only: For audio-only participants, the phone icon is shown without the client icon:
Audio-Disabled: If a participant with audio has been muted or placed on hold by the leader, the following icons will be displayed:
Sort participants by name
Sort participants by join order
Participant (non-leader) view
As a participant, you will have access to the following options:
Hand gesture menu :
Raise Hand
Yes
No
Options menu :
Show details for all participants: checkable preference that shows/hides the detailed information about participants feature access and audio status (default unchecked)
Line 1: shows either Leader or the Personal ID of the participant using the client.
Line 2: lists the audio status of the participant.
None means participant has no audio connection
Active, Muted or On Hold will be displayed for participants with audio. The caller ID phone number of the audio source will be provided if available.
For Audio-Through Client, the caller ID will display PC (for Personal Computer).
For other associated audio, a button to “Unassociate” the audio from the client is provided.
Line 3: identifies the ability to collaborate. If the participant is using one of the clients to view the conference, Collaboration: Available is displayed, otherwise Not Available is shown.
Show options for all participants: checkable preference that shows/hides the action/status buttons at all times instead of only on mouse hover (default checked)
These icons are a visual representation of the status of the participant:
Leader: The leader is shown with a different color icon: Also, the tool tip displayed when hovering over the leader’s name in the list will show the name of the leader appended with Leader.
Client: For a participant that is using one of the clients to view the conference, the client icon is displayed:
Audio: For a participant that has both a client and audio, the client icon is showed with a phone overlayed:
Audio-Only: For audio-only participants, the phone icon is shown without the client icon:
Audio-Disabled: If a participant with audio has been muted or placed on hold by the leader, the following icons will be displayed:
Sort participants by name
Sort participants by join order
The following options are available via right-click on one of the participant's name:
Give Remote Control Select a participant, and then right click to give them control of the conference.
Request Remote Control Select a participant, and then right click to take back control of the conference from that participant. A confirmation notice will appear once you have control of a participant.
Transfer / End Control
Select a participant, and then right click to transfer remote control. You will then be prompted to continue:
At any time the leader can select the participant being controlled or the user with control and end the control by selecting End Control of <participant's name>.
Please note: The leader must first Request Control of a participant before Transfer Control can be invoked.
Enable / Disable Whiteboard Tools Select an participant, and then right click to set or clear use of the whiteboard tools for them.
Acknowledge Hand Gesture If a participant has a raised hand icon next to his or her name, the participant wants to be acknowledged. Right-click the participant, and then select Acknowledge hand gesture option.
Mute Audio Use this option to mute the audio from this participant.
Hold Audio Use this option to hold audio for this participant (hold audio refers to blocking 2-way audio).
Unmute/Unhold Audio Use this option to restore audio from a previously muted participant.
Associate Participant Allows you to join or "associate" the audio and client legs of a conference. This action is available by right-clicking on the audio participant or by clicking the action button in the details view.
If the associate action is performed, the option to “unassociate” the audio leg is available via action button icon in the details view of the participant. This will let you unassociate audio if you made a mistake.Private Chat
You can select one or more participants and have a private keyboard chat conversation.
To have a Private Chat:
Right-click on a participant name in the Participants List with whom you want to chat.
Select Start a private chat.
Remove Selected Users Allows you to remove a participant from the conference. Select the check box next to their name.
View Menu - Chat
To use the Chat function, click the Chat option in the View menu.
You can choose from the following Chat options:
Public: You can open the public Chat window. The Chat window opens in the same pane as the Meeting Center window. To close the Public Chat window, click on View - Chat - Public again.
Show All: You can select this option to show all chat sessions currently underway.
Hide All: You can select this option to hide all chat sessions currently underway.
Clear Chat History: The leader can remove the chat content of the Web conference that is saved on the server. The Chat window will be empty for any participant who joins the chat session after the history is cleared, but not for those participants already in the chat session.
To clear chat history:
Select Clear Chat History option item under the Meeting menu.
Please note: Only the chat history up to the time you clear it is removed. If you continue the chat session, you must clear the history again to remove it.
Click the Clear Window Contents icon
 on the bottom right hand corner of the chat pane to clear the active chat window content.
Save Chat Contents: You can save the chat windows content locally on your PC.
To save content locally:
Right-click a participant or participants to include in your private chat from the list on the Participants pane.
Click Start a private chat with... to start a chat session.
Private Chat: The leader or a participant can select one or more conference participants to communicate with privately. Only the participants you select can see the private chat messages.
As the leader in a private chat with more than one participant, when a participant replies, only you can see their reply.
To have a Private Chat:
Right-click a participant or participants to include in your private chat from the list on the Participants pane.
Click Start a private chat with... to start a chat session.
View Menu - Dock Windows
The Leader and Participant consoles consist of multiple windows (or panes) that provide conferencing functions. You can undock and dock windows from the main console using the docking icon at the top of any pane. The docking menu enables you to do the following:
Float: The pane is no longer attached to any other pane and appears to float.
Show: A pane that is hidden or minimized is now shown.
Dock as a tabbed document: Redocks a floating or hidden pane as a tab of the main window.
Autohide: Converts the pane to a tab on the left side of the window. If you mouse over the tab, the pane is restored. You can turn off autohide by clicking the autohide icon again.
You can also autohide a window using the autohide icon on the pane itself.
Hide (hides the window)