Customizing Your 5360
Use the Settings application to customize your phone.
| Note: The System Administrator can invoke a Lock Default Configuration option on a per-phone basis. When this is in effect, the system administrator sets the settings for Programmable Keys and you cannot change them. |

Using the Settings Application
The Settings application provides a single location to access all your phone settings. Select any of the options below to access a window where you can view and configure settings for your phone.
| Note: You can access Settings by pressing the blue Menu key |


The Settings window provides the following:
- Programmable Keys: Use to assign features or applications to the Programmable Keys that are available in the Phone application.
- Languages: Allows you to select the language in which phone prompts and applications appear. Supported languages are English, French, Spanish, German, Dutch, Italian, and Portuguese. Note: The system can support up to three languages at one time. Language choices appearing in the phone display are controlled by ICP programming.
- Text Size: Allows you to specify the font size (large or small) for the 5360 IP Phone.
- Call Notification: Use to specify the Phone application behavior when incoming or outgoing calls occur.
- Brightness: Allows you to adjust the display brightness of your phone.
- Screen Saver: Sets a specific time of inactivity on your phone that triggers the screen to dim and a screen saver to display.
- Audio Feedback: This setting allows you to adjust the volume of the audio feedback as well as the error beeps, and enable or disable the setting.
- Message Key Configuration: Allows you to configure the Message
 key.
key. - PC Connectivity: Allows you to enter a password that is used by the phone to establish communications with the PC-resident Unified Communicator (UC) Express application.
- Float Keys: Allows you to enable or disable up to three float keys. Float keys are typically used to display unanswered ringing lines on designated keys where the ringing lines would otherwise be hidden on one of the phone's application pages.
- Calibrate Display: Allows you to calibrate the touch display for optimum touch sensitivity.
- AutoDial (if Cordless Module installed): Automatically dials the configured Auto Dial number.
- About 5360 IP Phone: This screen displays the software release.
Specify Language
To specify the language in which prompts and applications display:
- Press the blue Menu key
 .
. - Press Settings.
- Press Languages.The phone displays the three language selections that are currently programmed in the ICP.
- Select the appropriate language and press Save.The phone displays your chosen language.
| Note: Languages supported on the 5360 IP Phone may differ from those supported on the ICP. If the phone is configured for an unsupported language, the prompts may appear in your selected language but the Application language for the phone defaults to English. The Language window displays "(name of the selected language)(Unsupported)". |

Specify Text Size
To specify the text size that displays on the phone:
- Press the blue Menu key
 .
. - Press Settings.
- Press Text Size.
- Select Large Text or Small Text.
- Press Save.
Specify Call Notification Behavior
To specify that the Phone window automatically displays when you are making or receiving calls:
- Press the blue Menu key
 .
. - Press Settings.
- Press Call Notification.
- Press the appropriate options to identify when you want the Phone window to display. For example, if you select the Made option, each time the phone goes off hook to make a call, the Phone window is displayed.
- Press Save.
| Notes:
|

Adjust Display Brightness
To adjust the display brightness use the Settings application:
- Press the blue Menu key
 .
. - Press Settings.
- Press Brightness.
- Press the + or - keys to adjust the brightness of your screen.
- Press Save.
| Note: Press Cancel at any time to exit this application without making any changes. |

Specify Screen Saver timer
You can program your screen saver to turn on after a specific time period of inactivity on your phone.
To set the timer:
- Press the blue Menu key
 .
. - Press Settings.
- Press Screen Saver.
- Select the inactivity time, which will activate the backlight switch to dim.
- Use the Brightness options to adjust the Brightness of the screen saver, if necessary.
- Press Save.
Calibrate the Display
To calibrate the phone screen for touch accuracy:
- Press the blue Menu key
 .
. - Press Settings.
- Press Calibrate Display.
- Touch the center of each + to calibrate the display.
Specify Audio Feedback Options
The error beep volume in the phone is related to the volume of the speaker. You can set the beep volume using this procedure; however, adjusting the speaker volume also affects the beep volume.
To adjust the volume of the audio feedback:
- Press the blue Menu key
 .
. - Press Settings.
- Press Audio Feedback.
- Set the options using the appropriate actions described below:
Option | Action |
Turn audio feedback off for errors | Press |
Adjust audio for error beeps or button beeps | Press |
Turn audio feedback on for errors | Press |
- Click Save.
| Note: Press Cancel at any time to exit this application without making any changes. |

Enable Message Key
To enable the Message Key for voicemail:
- Press the blue Menu key
 .
. - Press Settings.
- Press Message Key Config.
- Enable the Open Voicemail App.
Enable PC Connectivity
To enable a connection to be set up between your phone and the Unified Communicator (UC) Express Application:
- Press the blue Menu key
 .
. - Press Settings.
- Press PC Connectivity.
- Press the checkbox Enable.
- Press Edit Password and enter a password.
- Press OK, and then press Save.
| Note: You can use the UC Express for easy PC-based programming of the labels on your phone. |

For more information on setting up the UC Express Application, refer to the Unified Communicator Express User's Guide on http://edocs.mitel.com.
Float Keys
Float keys are typically used to display unanswered ringing lines on designated keys where the ringing lines would otherwise be hidden on one of the phone's application pages. See Float Keys for more information.
Adjust the Ringer
To adjust the Ringer Volume while the phone is idle:
- Press Superkey (must be programmed to a key).
- Press the No softkey until "Ringer Adjust?" appears.
- Press "Ring Adjust".
- Press No.
- Press "Ringer Vol".
- Press
 (UP) or
  (DOWN) on your phone.
 - Press Superkey.
| Note: Adjusting ringer volume also adjusts cordless headset/handset ringer tone. |

To adjust the Ringer Volume while the phone is ringing:
- Press
 (UP) or
  (DOWN).
| Note: If the phone is in talk state, this action adjusts the volume of the handset, headset or speaker. |

To adjust the Ringer Pitch while the phone is idle:
- Press Superkey (must be programmed to a key).
- Press the No softkey until "Ringer Adjust?" appears.
- Press "Ring Adjust".
- Press "Ringer Pitch".
- Press
 (UP) or
  (DOWN) on your phone.
 - Press Superkey.
Cleaning Your 5360 IP Phone
You can wipe clean the touch screen of your 5360 IP Phone without causing touch-sensitive controls to be activated.
- Launch Applications.
- Press Clean Mode.
- Clean the screen of your phone.
- Press the blue Menu key
 to end Clean Mode.
Text Entry
The Text Entry feature provides a standard set of windows used by all applications for accepting user-entered text and numeric data. The Text Entry window opens when an application requires text input.
The following applications use Text Entry:
- Settings application – Programmable Key labels
- People application – names and phone numbers
Text Entry Window
The Text Entry window remains open during calls and other activities (see diagram below). For example, if you are entering the text of a Programmable Key label in the Settings application, and you receive an incoming call, the Text Entry's window will remain open even though it is hidden. When you eventually re-display Settings, the edit window reappears in the same state as when Settings was hidden.
The user interface consists essentially of
- An Input Area that displays up to a maximum of two lines of text.
- Text manipulation Control Keys, such as cursor right, cursor left, backspace, clear, and delete digit.
- Control Keys for saving and canceling the user's input
- Keyboard
- Navigation Keys
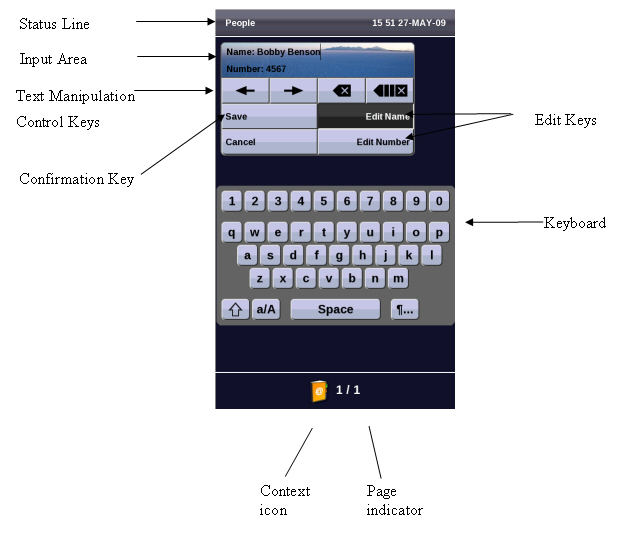
Status Line
The Text Entry window's Status Line displays either a text string or the time and date and this depends on the application that requires text entry.
Input Area
The Input area lets you see the text as you enter it, either in the name or number field.
Text Manipulation Control Keys
The text manipulation control keys provided in the Text Entry window are Cursor Left, Cursor Right, Backspace, Clear, and Delete Digit.
To use these control keys, an Input Field must be selected.
The Cursor Left ( ![]() ) and Cursor Right (
) and Cursor Right ( ![]() ) keys move the cursor left and right, respectively, in the Input Field without deleting characters.
) keys move the cursor left and right, respectively, in the Input Field without deleting characters.
The Backspace ( ![]() ) key removes the character to the left of the cursor in the Input Field.
) key removes the character to the left of the cursor in the Input Field.
The Clear ( ![]() ) key removes all characters from the Input Field.
) key removes all characters from the Input Field.
The Delete Digit ( ![]() ) key deletes a character to the right of the cursor in the Input Field. If there is no character following the cursor the Backspace key is ignored.
) key deletes a character to the right of the cursor in the Input Field. If there is no character following the cursor the Backspace key is ignored.
| Note: In some applications a Delete Digit key will be displayed instead of the Clear key. |

Keyboards
Two keyboard interfaces are provided for Text Entry: a numeric keyboard interface and an alphanumeric keyboard as described below.
Alphanumeric Keyboard
The alphanumeric keyboard consists of consists of thirty-six character keys, space and three control keys. The thirty-six character keys can be shifted case to provide thirty-six additional characters, providing a total of seventy-three different characters for data input.
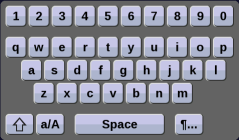
The character set includes the Space key, the numbers 0 through 9, the letters of the English language in both lowercase and uppercase and a subset of other Unicode characters which would be similar to the ASCII characters provided on a typical PC keyboard.
The Alphanumeric keyboard has four Character Keys views; only one view can be displayed at a time.
- Default view: This view consists of the lowercase version of the letters and numbers.
- Shifted Default view: This view consists of the uppercase version of the letters and the supported Unicode characters.
- Caps view: This view consists of the uppercase version of the letters and regular numbers.
- Shifted Caps view: This view consists of the lowercase version of the letters and the supported Unicode characters.
- Special Character view: This view consists of the supported symbols and the supported accented characters. Unlike the three views above, this view has a matrix layout and consists of more than one page of characters.
Numeric Keyboard
The numeric keyboard interface is used when the Input Field requires phone numbers or other numerical input. The numeric keyboard provides nineteen character keys that represent the standard dial pad on a phone: the numbers 0 through 9, the * key and the # key. The numbers appear as they would on a typical telephony dial pad. The seven remaining character keys include the Space key, -, +, (, ), Pause and Flash.
| Note: Some of the last seven character keys may not be displayed if the host application does not require them. |

Pressing a character key adds the character associated with the key to the left of the cursor in the input field. The Pause and Flash character keys will appear as P and F, respectively, in the input field.
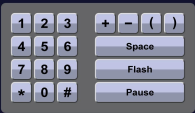
Numeric Keyboard
Some input buttons will not be available in some applications depending on the input required.
The keypad normally used for dialing calls can be used to enter numbers when the numeric keyboard is displayed.