Populating the Contact List (MAC)
Ways to populate UniVoIP App’s contact list:
- By importing contacts
- Creating one at a time
Populating by Importing Contacts
You can populate the UniVoIP App contact list by importing from an external file or files. You can also import your own file or files, as many as required.
You can import a contact list from:
- CSV. A comma-separated file. Use this method to import from a Microsoft® Excel® file. You will first have to set up the file; see below
- vCard. A vCard file (*.vcf file). A vCard is an electronic business card that is often attached to an e-mail
Setting up an Excel File for Import
- Remove any introductory text or headings from the top of the file. (You can keep text at the end of the file; it will be ignored during the import.)
- Insert a blank row as the first row, then insert the headings that UniVoIP App will use to interpret the meaning of each column. The columns can be in any order. Key headings are:
- sip-address. UniVoIP App recognizes a value in this column as a softphone address and considers the address as one that can be phoned and as an address that can be used for IM/presence (if SIP is being used for IM/ presence).
- xmpp_address: UniVoIP App recognizes a value in this field as a Jabber (XMPP) address and will map this field to the Jabber contact method for the contact. UniVoIP App considers a Jabber address as one that can be used for IM/presence (if XMPP is being used for IM/presence).
- display_name, given_name, surname
- business_number
- presence_subscription. Complete this column in one of these ways: If you only want to share presence information with some of your contacts, fill in this column in the file. Enter “true” for contacts whose online presence you want to see, leave blank or enter “false” for others. During the import, you will be able to choose to share presence with only these contacts. UniVoIP App will subscribe to the presence of these “true” contacts, assuming that the user has a SIP (if using SIP for presence).
3. Save the file as *.csv.
Importing Contacts
- From the main menu choose Contacts > Import Contacts. The Import Contacts wizard starts.
- As soon as you click Finish on the wizard, the Contacts tab in UniVoIP App is updated to show the imported entries.
Exporting Contacts
You can export a contact list to a CSV or vCard.
- From the Menu Bar, choose Contacts > Export Contacts. The Export Contacts wizard starts.
- Select the export file type and click Next, the export starts.
Adding a Contact – Live Call or History Tab
You can add a contact by capturing existing information:
- If you are on a phone call with a non-contact, click the Add to Contacts button in the call panel.
- On the History tab, select an entry that is not a contact. Control-Click and choose Add Contact. The Contact Profile dialog appears. Complete the dialog as desired and press OK.
Manually Adding a Contact
Click ![]() or Control-Click on a Group and select Add Contact to Group. The Contact Profile dialog appears.
or Control-Click on a Group and select Add Contact to Group. The Contact Profile dialog appears.
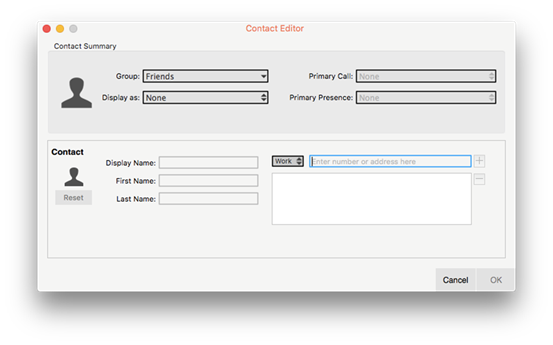
Contact Summary Table
Field | Description |
Group | Click to show the list of groups. Check each group this contact should belong to. |
Primary Call | If the contact has more than one number, select the primary number. This number will be used with single-click calling. |
Primary presence | This field appears only the contact has more than one Softphone number or Instant Message address. The primary presence is used as follows: The presence icon on the contact list shows the online status for this address. The single-click action for instant messaging uses this address. You can still send IMs to this person at their other addresses, but you must Control-Click and choose from the context menu. |
Display name (required) | The display name for this source of information. For example, the display name from the XMPP contact list. |
First name, Last name | Optional. |
Contact Methods | Enter as many contact methods as you want. Enter a person’s IM address as follows: • If you use the SIP account for IM and presence, choose Softphone. • If you use a XMPP account for IM and presence, choose Instant Message. If you have more than one account of a given type, include the domain (for example,1440@domainA.com) to ensure that the number or address gets associated with the correct account. |
Presence | This field is automatically populated when you enter an address in the Softphone or Instant Message field. It indicates that you are sharing online presence information using this address. The address is also shown in the list in the Primary presence field, above. |
Changing Contact Information
To change the information for a contact, Control-Click the contact and choose Edit Profile.
Merging and Splitting Contacts
To merge contacts, select contacts and right-click to reveal the menu. Or you can drag one or more contacts to a contact. The dialog appears confirming that you want to merge contacts.
Deleting a Contact
To delete one or more contacts, select them, Control-Click, and choose Delete Contact or Delete Selected. The contacts are removed from this group. If a contact belongs to several groups, it is removed from all groups.