Polycom VVX Features
Other phone features include
- Forwarding and Call Coverage
- DND
- SIP 302 Handling
- Reject Calls
- Corporate Directory
- Page Groups (VVX)
- BLF Features
- Monitor Extension
- Park Location
- Twinning Pullback
Forwarding and Call Coverage
Forwarding and Call Coverage are embedded on VVX phones, including a Forward softkey (for example, ![]() ) and a Forward feature icon (for example,
) and a Forward feature icon (for example, ![]() ). You can toggle whether the softkey appears on the phone using the softkey in the Predefined Soft Keys section in WebAdmin; however, the feature key is disabled/removed when users log out from VVX phones.
). You can toggle whether the softkey appears on the phone using the softkey in the Predefined Soft Keys section in WebAdmin; however, the feature key is disabled/removed when users log out from VVX phones.
Forwarding is either CFA (Call Forwarding Always) or CC (Call Coverage), which is a combination of
- CFNA—Call Forwarding No Answer
- CFB—Call Forwarding Busy
- CFU—Call Forwarding Unavailable
Call Forwarding Always takes precedence over DND, which takes precedence over Call Coverage.
To enable the features using the phone, follow these steps:
- Press either the softkey or the feature icon.
- Select Always or Busy/NA
- Enter a number to forward calls to or *22, CC, or Coverage.
- Press Enable.
The phone displays to indicate that Call Forwarding is enabled.
 - Enter the Contact to cover calls to or *99, VM, or Voicemail.
- Enter a number from 1-20 in the Forward After Rings field.
- Press Enable.
You can use the feature to deflect a call while the phone is ringing. However, if you want to deflect an incoming call on a particular VVX phone only, use Reject Calls. If you want to silence an incoming call from ringing, use the default Ignore softkey on the phone.
Not all calls are diverted when the feature is active. For example, when your call group rings, it overrides the feature.
To enable Forwarding using WebAdmin, see Call Forwarding (Always).
Disable Forwarding
To disable Forwarding on VVX phones, select the active Forwarding mode and select Disable.![]() disappears from the phone.
disappears from the phone.
To disable Forwarding on WebAdmin, unassign the PMK.
DND
Do Not Disturb (DND) is embedded on VVX phones, including a DND soft key (for example, ![]() ) and a DND feature icon (for example,
) and a DND feature icon (for example,  ). You can toggle whether the softkey appears on the phone using the softkey in the Predefined Soft Keys section in WebAdmin; however, the feature icon is disabled/removed when users are logged out of VVX phones. See Predefined Soft Keys.
To enable DND using the softkey, press either the DND soft key or the DND icon.
The phone displays ![]() to indicate that the feature is enabled.
to indicate that the feature is enabled.
To enable DND using WebAdmin, see Do Not Disturb.
- The default DND softkey is not available when the phone is in a ringing state.
- Not all calls are diverted when the feature is active. For example, when your call group rings, it overrides the feature.
BLF Features
BLF features include
- Monitor Extension
- Answer Extension
- Attendant Monitor
- Attendant Answer
- Park Location
- Pickup Groups
- Twinning Pullback
Monitor Extension (programmable on any available Line Key)
Monitor Extension is available to secondaries with monitor permissions via Monitor Groups.
It acts as speed dial when idle.
To program a Line/BLF Key as a Monitor Extension, follow these steps:
- Click My Phones in the left menu.
The system displays the My phones page. - Select the phone name from the Phone Name drop-down list.
- Click a Line/BLF key.
The Program Memory Key Details page appears. - Complete the following fields. See Programmable Memory Key Features.
- Feature: Select Monitor Extension.
- Label: (Optional) Type in a description. If no description is typed the system default is applied. The default label is Monitor <extension>.
- Details: From the drop-down list, select the line that you want to monitor or answer. Only those lines that you have permissions to monitor appear.
5. Click Save.
6. Click Close Window.
The Monitor Extension key
- places an active call on hold and dials the primary when pressed
- acts as speed dial when idle
- does not show the off-hook state
- provides idle/confirmed states only
- does not provide CallerID info at any time
Answer Extension
Answer Extension is available to secondaries with answer permissions via Monitor Groups.
To program a Line/BLF Key as an Answer Extension, follow these steps:
- Click My Phones in the left menu.
- The system displays the My phones page.
- Select the phone name from the Phone Name drop-down list.
- Click a Line/BLF key.
- The Program Memory Key Details page appears.
- Complete the following fields. See Programmable Memory Key Features.
- Feature: Select Answer Extension.
- Label: (Optional) Type in a description. If no description is typed the system default is applied. The default label is Answer <extension>.
- Details: From the drop-down list, select the line that you want to monitor or answer. Only those lines that you have permissions to answer appear.
- Click Save.
- Click Close Window.
The Answer Extension key
- places an active call on hold and dials the primary when pressed
- does not show the off-hook state
- provides idle/early/confirmed states
- provides a screen pop in the early state
- picks up the ringing call in the early state when pressed
- always includes CallerID when available
- when the Answer Extension key rings, the tone is different from the regular ring; see Configure Ring Tones
Attendant Monitor
Attendant Monitor is available to secondaries with monitor permissions via Monitor Groups.
To program a Line/BLF Key as an Attendant Monitor, follow these steps:
- Click My Phones in the left menu.
- The system displays the My phones page.
- Select the phone name from the Phone Name drop-down list.
- Click a Line/BLF key.
- The Program Memory Key Details page appears.
- Complete the following fields. See Programmable Memory Key Features.
- Feature: Select Attendant Monitor.
- Label: (Optional) Type in a description. If no description is typed the system default is applied. The default label is Attendant(a) Monitor.
- Details: From the drop-down list, select the line that you want to monitor or answer. Only those lines that you have permissions to monitor appear.
- Click Save.
- Click Close Window.
The Attendant Monitor
- blind transfers an active call to the primary when pressed.
- does not show the off-hook state
- does not provide CallerID info at any time
- provides idle/confirmed states only
- returns an error when you press Pickup and select any confirmed dialog
Attendant Answer
Attendant Answer is available to secondaries with answer permissions via Monitor Groups.
To program a Line/BLF Key as an Attendant Answer, follow these steps:
- Click My Phones in the left menu.
- The system displays the My phones page.
- Select the phone name from the Phone Name drop-down list.
- Click a Line/BLF key.
The Program Memory Key Details page appears.
- Complete the following fields. See Programmable Memory Key Features.
- Feature: Select Attendant Answer.
- Label: (Optional) Type in a description. If no description is typed the system default is applied. The default label is Answer(a) <extension>.
- Details: From the drop-down list, select the line that you want to monitor or answer. Only those lines that you have permissions to answer appear.
- Click Save.
- Click Close Window.
The Attendant Answer key
- picks up the ringing call in the early state when pressed
- blind transfers an active call to the primary when pressed
- does not show the off-hook state
- provides idle/early/confirmed states
- suppresses screen pop in early state
- always includes CallerID when available
- returns an error when you press Pickup and select any confirmed dialog
Park Location (programmable on any available Line Key)
Park Location lets you monitor, park and retreive calls on a parked location.
To program a key for a Parked Location, follow these steps:
- Click My Phones in the left menu.
The system displays the My Phones page. - Select the phone name from the Phone Name drop-down list.
- Click the Line/BLF key that you want to program.
The system displays the Program Memory Key Details page. - Complete the following fields.
- Feature: Select Park Location.
- Label: (Optional) Type in a description. If no description is typed the system default (Park on <location>) is applied.
- Details: Select the Park Location from the drop-down menu. You can currently select 1 through 9 as the dedicated parking spot.
5. Click Save.
6. Click Close Window.
When a call is active, press the key to park it. When a call is parked, press the key to retrieve it.
Twinning Pullback (programmable on any available Line Key)
Twinning Pullback lets you monitor and pick up (from your desk phone) active Twinned Calls on your twinned device. This feature is only available when Twinning is enabled.
To program a key for Twinning Pullback, follow these steps:
- Click My Phones in the left menu.
The system displays the My Phones page. - Select the phone name from the Phone Name drop-down list.
- Click the Line/BLF key that you want to program.
The system displays the Program Memory Key Details page. - Complete the following fields.
- Feature: Select Twinning Pullback.
- Label: (Optional) Type in a description. If no description is typed the system default (Twin PB) is applied.
5. Click Save.
6. Click Close Window.
7. Activate Twinning on the My Call Handling web page.
When your twinned device answers the call, the Line/BLF key you programmed as Twin PB illuminates. Press Twin PB to pull back the twinned call.
When the key is pressed in idle mode, a speed dial is executed to "twinning".
SIP 302 Handling
OfficeConnect Business Edition respects the local call forwarding settings on SIP phones—Always, No Answer, or Busy—distinct from OfficeConnect Business Edition settings. OfficeConnect Business Edition Call Handling settings always take priority over the local phone settings. The local phone settings only apply once the call has landed on the phone.
In multi-desking scenarios, only phones configured with call forwarding settings are relevant. Phones with the lowest number of rings configured before call forwarding, forward first.
Reject Calls
You can reject a call to stop your phone from ringing and end the call, regardless of whether you are already on a call. Rejected calls display in your Recent Calls list.
To reject a call, from the Incoming Call window, press Reject. You can also reject an incoming call from Lines and Calls view.
- Pressing Reject rejects the call to that phone only; that is, other devices will ring for multi-desked users.
- BLFs also continue to alert even when you are on the phone.
Corporate Directory
You can access the Corporate Directory regardless of whether you are logged into a phone. Searches behave as if a '*' wild card is appended to the end of the search term.
To view your Corporate Directory:
VVX 300 / 400 series
- Press the Home key
 .
. - Use the arrow keys to highlight Directories
 .
. - Press the OK button located in the center of the Arrow keys
 .
. - Press the Select soft key
 .
.
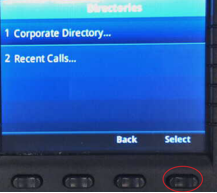
VVX 500 / 600
- Press the Home key
 .
. - Press Directories on the touchscreen
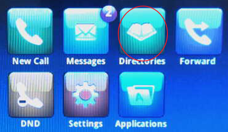 .
. - Press Corporate Directory on the touchscreen
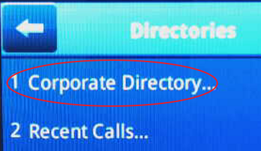 .
.
Quick Search
Quick Search only searches for last names and location names.
- Press Home.
- Press Directories.
- Press Corporate Directory.
- Enter your search criteria.
- Press Submit.
The system returns results based on your search criteria.
- Optionally, press View to see more information about the subscriber.
- Press Dial to call the subscriber.
Advanced Find
Advanced Find searches based on Last Name, First Name, and Phone Number. If a subscriber in your search results has no first name, there is no first name line in the search results.
- Press Home.
- Press Directories.
- Press Corporate Directory.
- Press AdvFind.
- Enter your search criteria.
- Press Submit.
The system returns results based on your search criteria.
- Optionally, press View to see more information about the subscriber.
- Press Dial to call the subscriber.
If you cannot connect to the Corporate Directory, contact Support.
Page Groups (VVX)
Paging is enabled by default for all logged in and logged out VVX phones. Page groups is enabled when page group members log in.
To page a group, follow these steps:
- While the phone is idle, press Paging.
- Select one of the following:
- 1. Default: Site Page
- 2. Recent:
- 3. <Page Group>:
3. Press Page.
4. When finished, press End Page.
Logged-in devices
- Always receive a site page
- Always receive pages for page groups of which the logged in user is a member
- Can only initiate pages when default page softkey is provisioned
- Can always initiate site page
- Can only initiate pages for page groups of which the logged in user is a member
Logged-out devices
- Cannot initiate a page
- Can only receive a site page
Feature Interaction
- Polycom's page feature does not interwork with Mitel's page feature
- Polycom phones can initiate and receive pages to other Polycom phones
- Mitel phones can initiate and receive pages to other Mitel phones, according to page group permissions