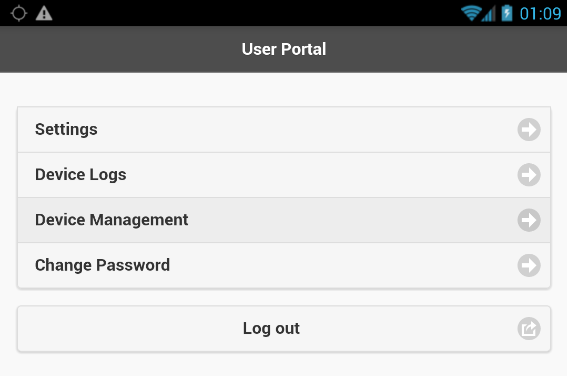
Settings (Android Phone)

|
|
Device Settings | Press to change your App Password or enter your Phone PIN Number |
Accounts | Press to toggle on or off either your OfficeConnect SIP (ability to make or take calls using the UniVoIP App)…or "Messaging" which is your ability to send or receive Instant Messages. |
Preferences | This is where most of your settings are found, including the ability to forward your business calls. |
Advanced Settings | This is where you will find microphone and speaker gain controls, and be able to send troubleshooting data logs to UniVoIP. |
About UniVoIP App | This is where you can see what version of the UniVoIP App you are using. |
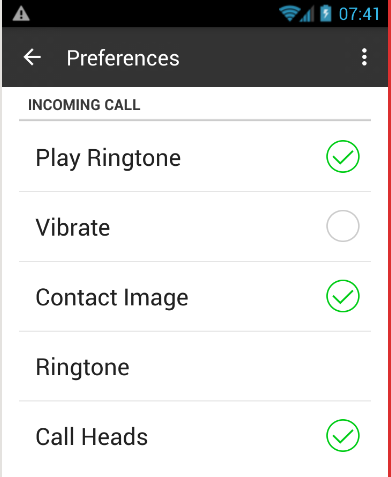
Device Settings
|
|
Settings | Press to enter your current Phone PIN Number |
Device Logs | Press to view your device logs |
Device Management | Press to view the devices currently linked to your UniVoIP App profile |
Change Password | Press to change your UniVoIP App Password |
Log Out | Press to Log Out of the UniVoIP App |
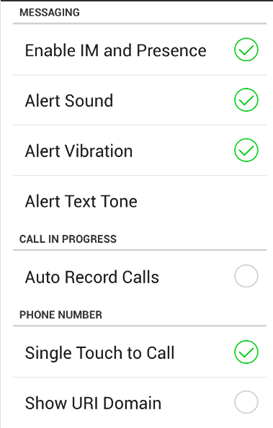
Preferences
Field | Description |
|
Incoming Call |
| |
Play Ringtone | ON to hear the ringtone. |
|
Vibrate | ON to vibrate when you receive a call. |
|
Contact Image | ON to display the image of your contact while receiving or making calls. Use the Android native app to save photos of contacts. |
|
Ringtone | Set to the desired ringtone. |
|
Call Heads | Turn this on to see a small icon "on top" of other Apps to be able to quickly get back to UniVoIP App call controls. |
|
Preferences
Field | Description |
|
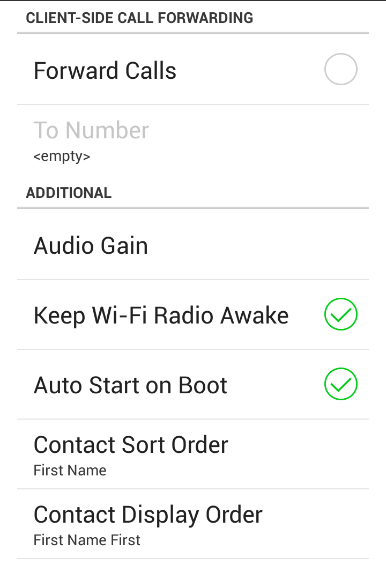
Messaging |
| |
Enable IM & Presence | ON to enable IM and Presence on UniVoIP App. |
|
Alert Sound | ON to play a ringtone when you receive a new message. |
|
Alert Vibration | ON to vibrate when you receive a new message. |
|
Alert Text Tone | The ringtone for incoming messages. |
|
Call in Progress |
| |
Auto Record Calls | This records all calls incoming and outgoing. It results in a wav file saved on the device that can be reviewed when tapping on the call in call history. |
|
Phone Number |
| |
Single Touch to Call | When ON, tapping a phone number on the Contacts or History tab will immediately make a call. However, if video is enabled on the account, user will get a prompt to choose call/video. When OFF, user will see a confirmation prompt. |
|
Show URI Domain | ON: The phone number displayed for an incoming, outgoing or established call will include the domain name (for example, 1234@myVoipProvider.com). OFF (default): The domain name isn't included in the display. |
|
Preferences
Field | Description |
|
Client-Side Call Forwarding |
| |
Forward Calls | ON to send all incoming calls to a specific number. If UniVoIP App is enabled and registered, incoming calls are forwarded to this phone number. |
|
To Number | The number to forward calls to when Forward Calls is on. |
|
Additional |
| |
Audio Gain |
|
|
Keep Wi-Fi Radio Awake | Controls whether the Wi-Fi radio stays on when the screen goes dark (smartphone gets auto locked). |
|
Auto Start on Boot | ON to automatically start UniVoIP App when you start your Android smartphone. |
|
Contact Sort Order | Changes how to display someone's name in your Contacts list. |
|
Contact Display Order | Choose first name or last name first. |
|
Preferences
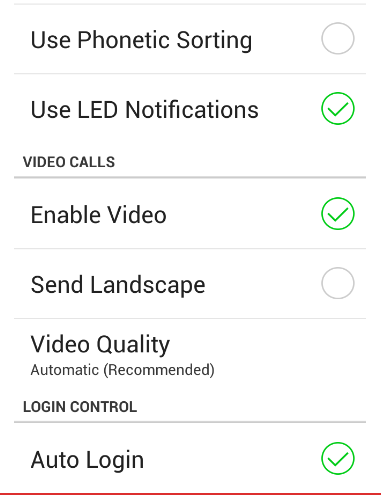
Field | Description |
|
Use Phonetic Sorting | ON to sort contacts by phonetic names such as Yomigana/Furigana or Pinyin. Enabling this preference will slow contact loading. The default is off. When contact names include Japanese or Chinese characters and the names do not appear correctly on UniVoIP App, enabling this preference may solve the problem. |
|
Use LED Notifications |
|
|
Video Calls |
| |
Enable Video | ON to make video calls on UniVoIP App. |
|
Send Landscape | When ON, your video will be forcibly sent in the landscape orientation. This is a compatibility mode for older devices that cannot render video in the portrait orientation. Use as an exception. The default is OFF. |
|
Video Quality | Automatic: Recommended. Let UniVoIP App select the best quality to use in a given situation. |
|
Login Control |
| |
Auto Login | ON to automatically login to UniVoIP APP when it's started. |
|
Advanced Settings
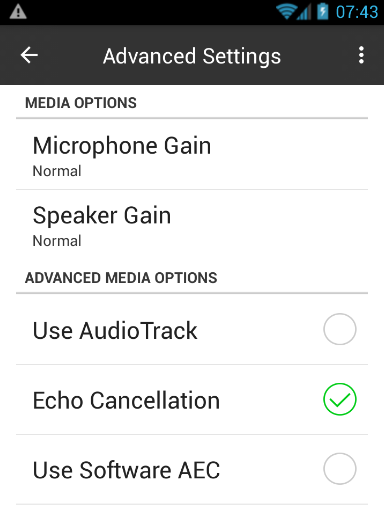
Field | Description |
|
Media Options |
| |
Microphone Gain | You can reduce your microphone gain if you are sounding too loud. |
|
Speaker Gain | You can reduce your speaker gain if others sound too loud. |
|
Advanced Media Options |
| |
Use Audio Track | Turn on and test if having audio issues that are not network related. |
|
Echo Cancellation | Turn on if anyone is hearing echoes. |
|
Use Software AEC | Turn on for "Acoustic Echo Cancelation" for sounds entering your microphone. |
|
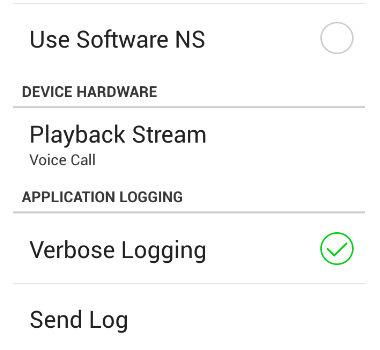
Advanced Settings
Field | Description |
|
Advanced Media Options Cont. |
| |
Use Software NS | Attempts to provide Noise Suppression when on. |
|
Device Hardware |
| |
Playback Stream | If you're receiving poor audio, try changing this setting. |
|
Application Logging |
| |
Verbose Logging | Leave OFF unless Customer Support instructs you to turn it on to troubleshoot a problem. |
|
Send Log | Tap to upload the current Log to Customer Support |
|