Auto Attendant Menus
This section describes how to set up and manage Auto Attendant menus. See the following topics:
- View Auto Attendant Menu Details
- Configure Auto Attendant Menu Options
- Add an Auto Attendant Sub-menu
- Delete an Auto Attendant Sub-Menu
Configure Auto Attendant Menu Options
This section describes how to set up or modify the options for Auto Attendant menus. The menu options define how the system responds when a caller selects a phone key.
Menu options can be assigned to each of the following phone keys: 1-9, 0, *, and #.
Please note: When configuring an Auto Attendant menu, consider the extensions that are assigned to your users and locations. Extension numbers that are assigned to users must not share digits with phone key numbers that are used for Auto Attendant menu options. For example, if you have users assigned to extensions 200 to 210 and you configure your main Auto Attendant menu to use the "2" key to access a broadcast group, callers to the Auto Attendant will not be able to reach these users by dialing their extension directly. Dialing a 2 will immediately send the call to the broadcast group.
The choices for each phone key are as follows:
Option | Description |
|---|---|
ACD Applications | Transfers the caller to a managed ACD Application. |
Auto Attendant | Transfers the caller to another specified Auto Attendant. |
Call Group | Transfers the caller to a specified call group. |
Extension (dialed) | Transfers the caller to the dialed extension. |
First Name Directory | Transfers the caller to the Internal Company Directory, where entries are listed by first name. |
Invalid Key | Configures the phone key as unassigned. If a caller presses that phone key on the dial pad, an error message is played. |
Last Name Directory | Transfers the caller to the Internal Company Directory, where entries are listed by last name. |
Previous Menu | The caller can jump back one menu level. |
Sub-menu | Transfers the caller to another menu under the parent menu. |
System Disconnect | Disconnects the caller from the system, terminating the call. |
User | Transfers the caller to a specified user. |
Voicemail Deposit | Prompts the caller for an extension and then transfers them directly to the voicemail box associated with that extension for voicemail deposit. |
Voicemail Retrieval | Prompts the caller for their extension and then transfers them to their own voicemail box for voicemail retrieval. |
| Enterprise Extension Prefix | An Auto Attendant is associated with a given tenant, and typically directs calls within the tenant. However, in enterprise tenants that require inter-tenant intra-enterprise calling, auto attendant(s) can be configured to accept prefix, outdigit, tenant routing code and extension information for these calls. |
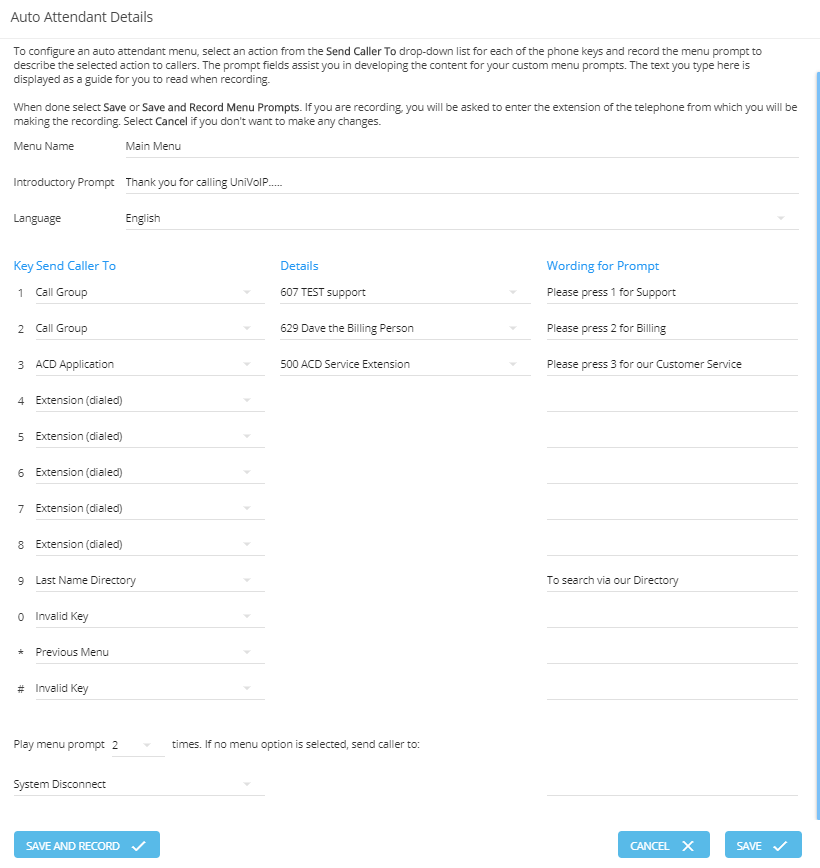
To set up or modify Auto Attendant choices, follow these steps:
- Select Auto Attendant in the left menu.
- Select the Name of an Auto Attendant from the list, or click on the edit icon.
- Click on Main Menu
- Enter a name for the menu in the Menu Name field
- Type the introductory prompt text for the menu in the Introductory Prompt field (optional). This additional text is saved and can later be used to guide you through recording menu prompts.
- Select the language for the menu from the Language list (if required). The language you select is used to determine the language for the default menu prompts and error messages. The Language list displays the languages supported...currently only English is supported.
- Select an option from the Send Caller To list for each of the phone keys.
- Type prompt text for each phone key configured in the associated Wording for Prompt field (optional). This additional text is saved and can later be used to guide you through recording menu prompts.
- Select the number of times that you want the Auto Attendant menu prompts to be repeated from the Play menu prompt list.
- Configure an action for the Auto Attendant if there is no input from the caller (for example, if a caller was not using a touch tone phone) after the prompts have been repeated the configured number of times in the Play menu prompt list. There are four options: ACD Application, Call Group, System Disconnect, and User.
- Click Save or Save And Record
- Record a new menu prompt for the affected Auto Attendant menu. If you do not record a new menu prompt, callers will not know how to navigate the Auto Attendant. See Record Audio Prompts and Greetings.
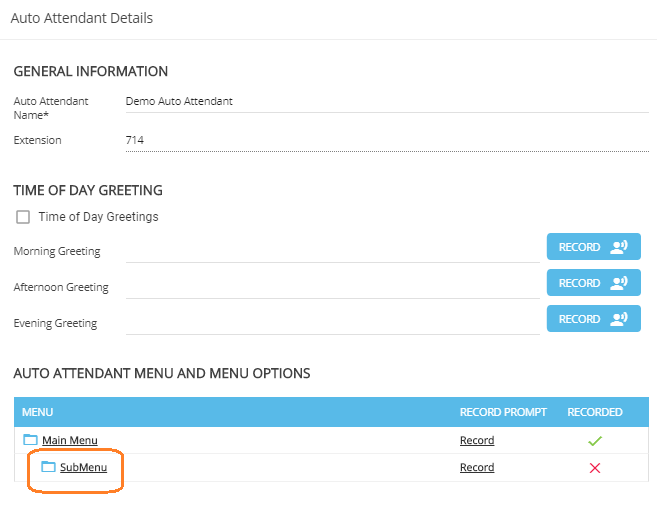
View Auto Attendant Menu Details
To view all the menus and choice configurations for a selected Auto Attendant, follow these steps:
- Expand Company Settings and click Auto Attendant in the left menu.
- Click the Name of the Auto Attendant you want to edit, or click on the Edit icon.
- Click View Expanded Tree at the bottom of the page.
The system displays an expanded tree view with the Main menu, all sub-menus and associated choices for the selected Auto Attendant.
Add an Auto Attendant Sub-menu
To set up an Auto Attendant menu to reference another auto attendant menu, follow these steps
- Expand Company Settings and click Auto Attendant in the left menu.
- Click the Name of the Auto Attendant you want to edit, or click on the Edit icon.
- Click the link on Main Menu within the Auto Attendant Menu and Menu Options section.
- Select the Sub-menu option from the Send Caller To list for the phone key you want the new menu to start from.
- Type the prompt text for the Sub-menu option in the associated Wording for Prompt field (optional). This text is saved and can later be used to guide you through recording menu prompts.
- Click Save.
- Configure choices for the new sub-menu. Refer to the Configure Auto Attendant menu options section for details. Sub-menus are created with default menu options and prompts. By default, sub-menus are configured to use the same language as the parent menu. See Add Auto Attendant for a description of the default menu options.
Delete an Auto Attendant Sub-menu
To delete an Auto Attendant submenu, follow these steps:
- Expand Company Settings and click Auto Attendant in the left menu.
- Click the Name to select an Auto Attendant from the list or click on the Edit icon.
- Click the link on Main Menu within the Auto Attendant Menu and Menu Options section.
- Change the Sub-menu option to another option in the Send Caller To list for the phone key that contains the sub-menu you are deleting.
- Type prompt text for the choice that has replaced the Sub-menu option in the associated Wording for Prompt field (optional). This additional text is saved and can later be used to guide you through recording menu prompts.
- Click Save.
- Re-record your menu prompt to reflect the change in the affected menu. Refer to the Record audio prompt section for details.
Please note: When you delete a sub-menu, the prompts that have been recorded for the sub-menu are also deleted.